** 가시다님이 진행하는 CI/CD Study 내용을 기반으로 정리 및 작성하였습니다.
0. 실습 환경 구성
Kind K8s 배포
  (⎈|N/A:N/A) gaji:~$ kind create cluster --name myk8s --image kindest/node:v1.32.8 --config - <<EOF
> kind: Cluster
> apiVersion: kind.x-k8s.io/v1alpha4
> nodes:
> - role: control-plane
>   extraPortMappings:
>   - containerPort: 30000 # Vault UI
    host>     hostPort: 30000
rPort:>   - containerPort: 30001 # Jenkins UI
    host>     hostPort: 30001
- contai>   - containerPort: 30002 # DB 배포(PostgreSQL 또는 MySQL)
    host>     hostPort: 30002
>   - containerPort: 30003 # # Sample App
>     hostPort: 30003
> EOF
Creating cluster "myk8s" ...
 ✓ Ensuring node image (kindest/node:v1.32.8) 🖼
 ✓ Preparing nodes 📦
 ✓ Writing configuration 📜
 ✓ Starting control-plane 🕹️
 ✓ Installing CNI 🔌
 ✓ Installing StorageClass 💾
Set kubectl context to "kind-myk8s"
You can now use your cluster with:

kubectl cluster-info --context kind-myk8s

Thanks for using kind! 😊
1. Vault 개요
vault란?
- HashiCorp Vault는 신원 기반(identity-based)의 시크릿 및 암호화 관리 시스템입니다.
- 이 시스템은 인증(authentication) 및 인가(authorization) 방법을 통해 암호화 서비스를 제공하여 비밀에 대한 안전하고 감사 가능하며 제한된 접근을 보장합니다.
- **시크릿(Secret)**이란 접근을 철저히 통제하고자 하는 모든 것을 의미하며, 예를 들어 토큰, API 키, 비밀번호, 암호화 키 또는 인증서 등이 이에 해당합니다.
- Vault는 모든 시크릿에 대해 통합된 인터페이스를 제공하면서, 엄격한 접근 제어와 상세한 감사 로그 기록 기능을 제공합니다.
- 외부 서비스용 API 키, 서비스 지향 아키텍처 간 통신을 위한 자격 증명 등은 플랫폼에 따라 누가 어떤 시크릿에 접근했는지를 파악하기 어려울 수 있습니다.
- 여기에 키 롤링(교체), 안전한 저장, 상세한 감사 로그까지 추가하려면 별도의 커스텀 솔루션 없이는 거의 불가능합니다. Vault는 바로 이 지점에서 해결책을 제공합니다.
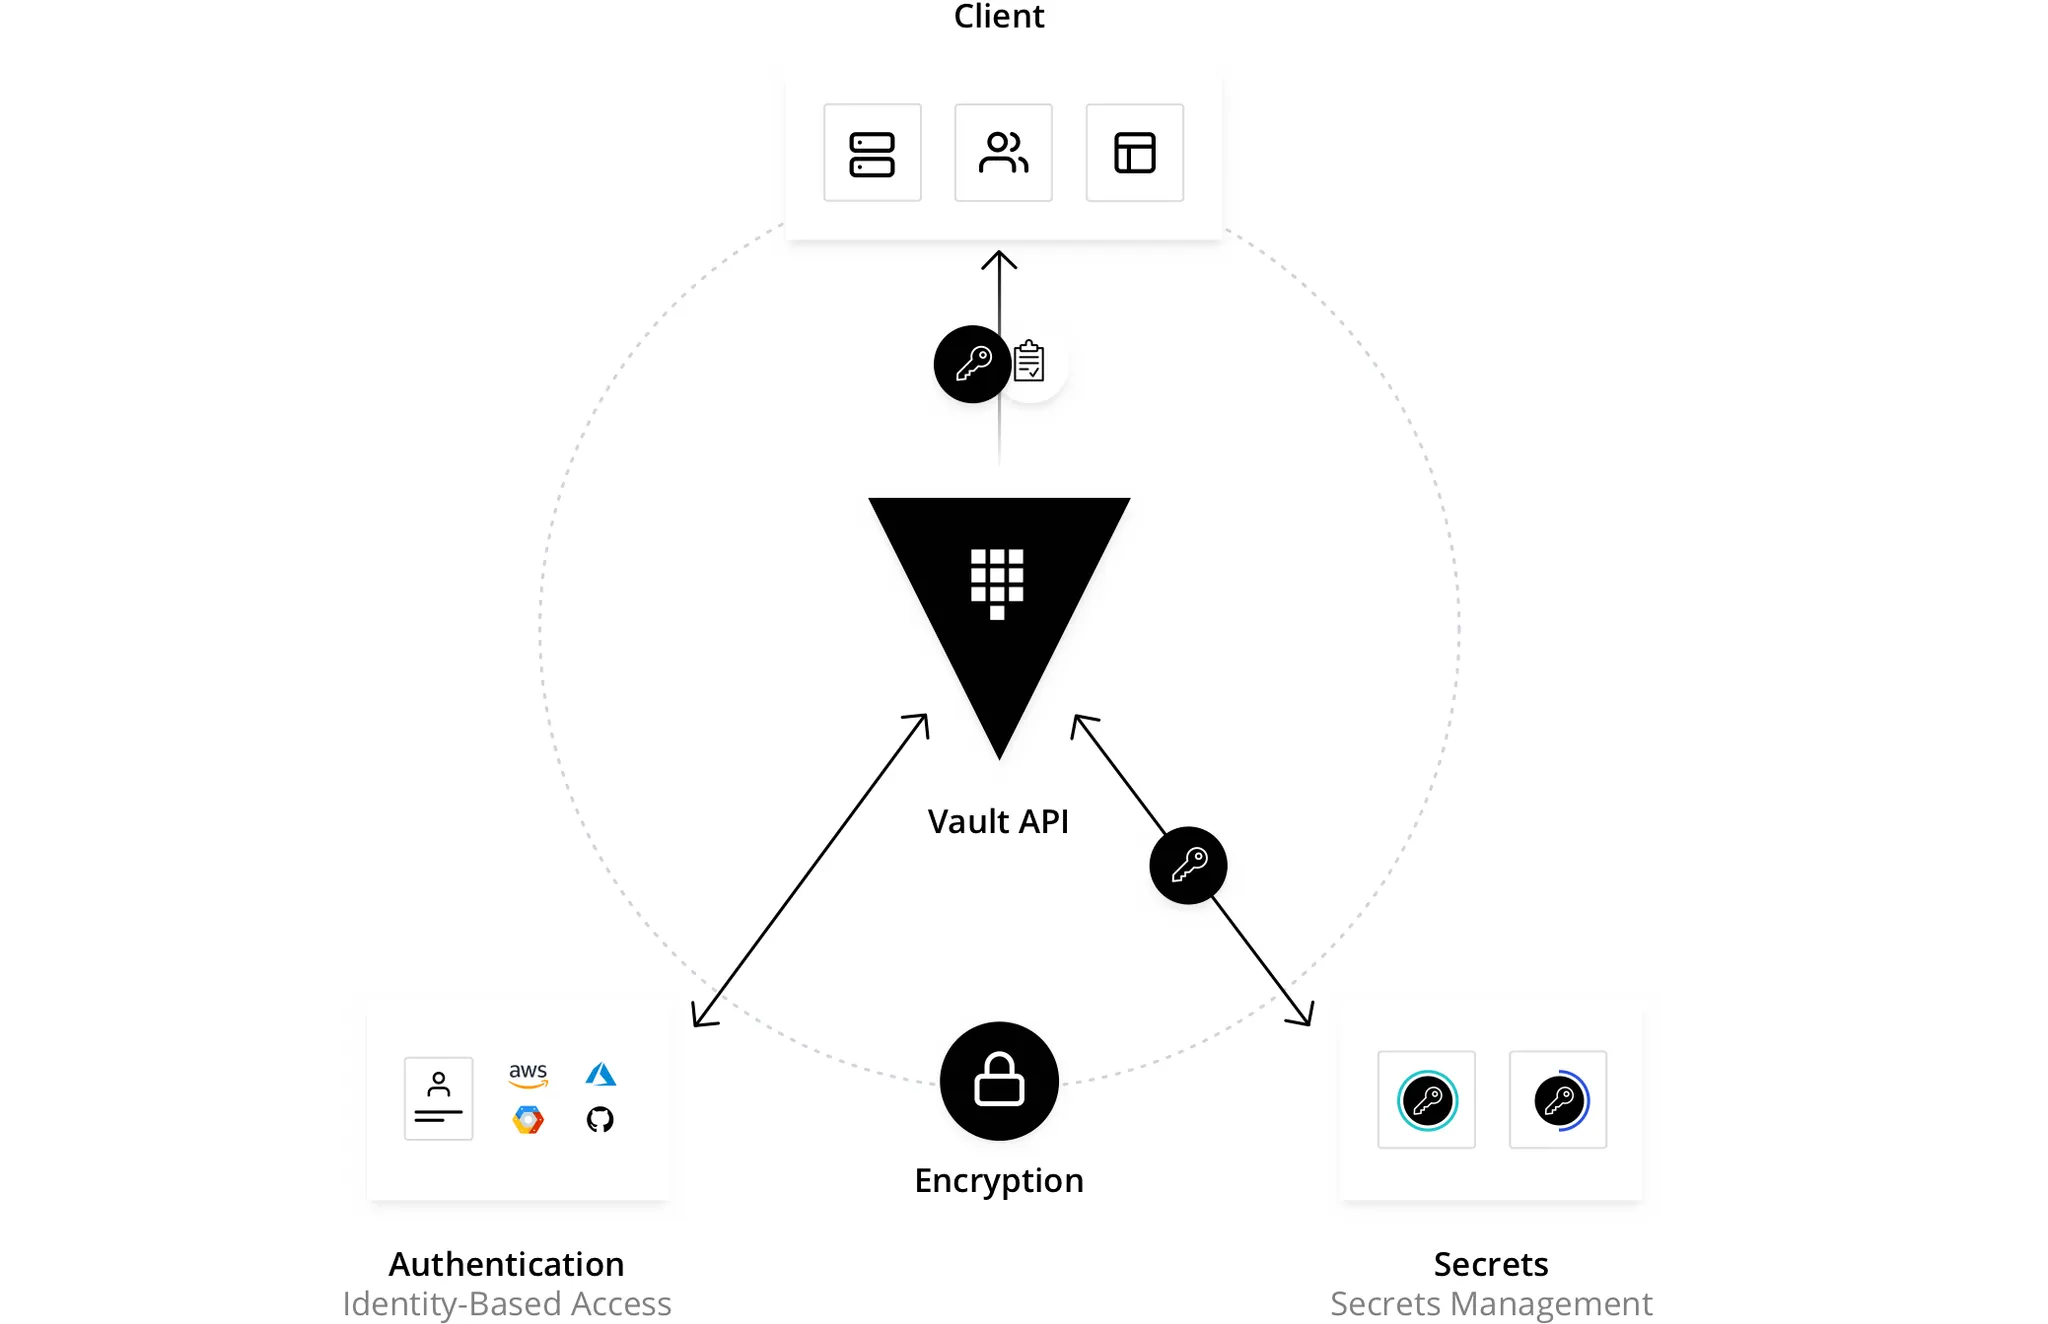
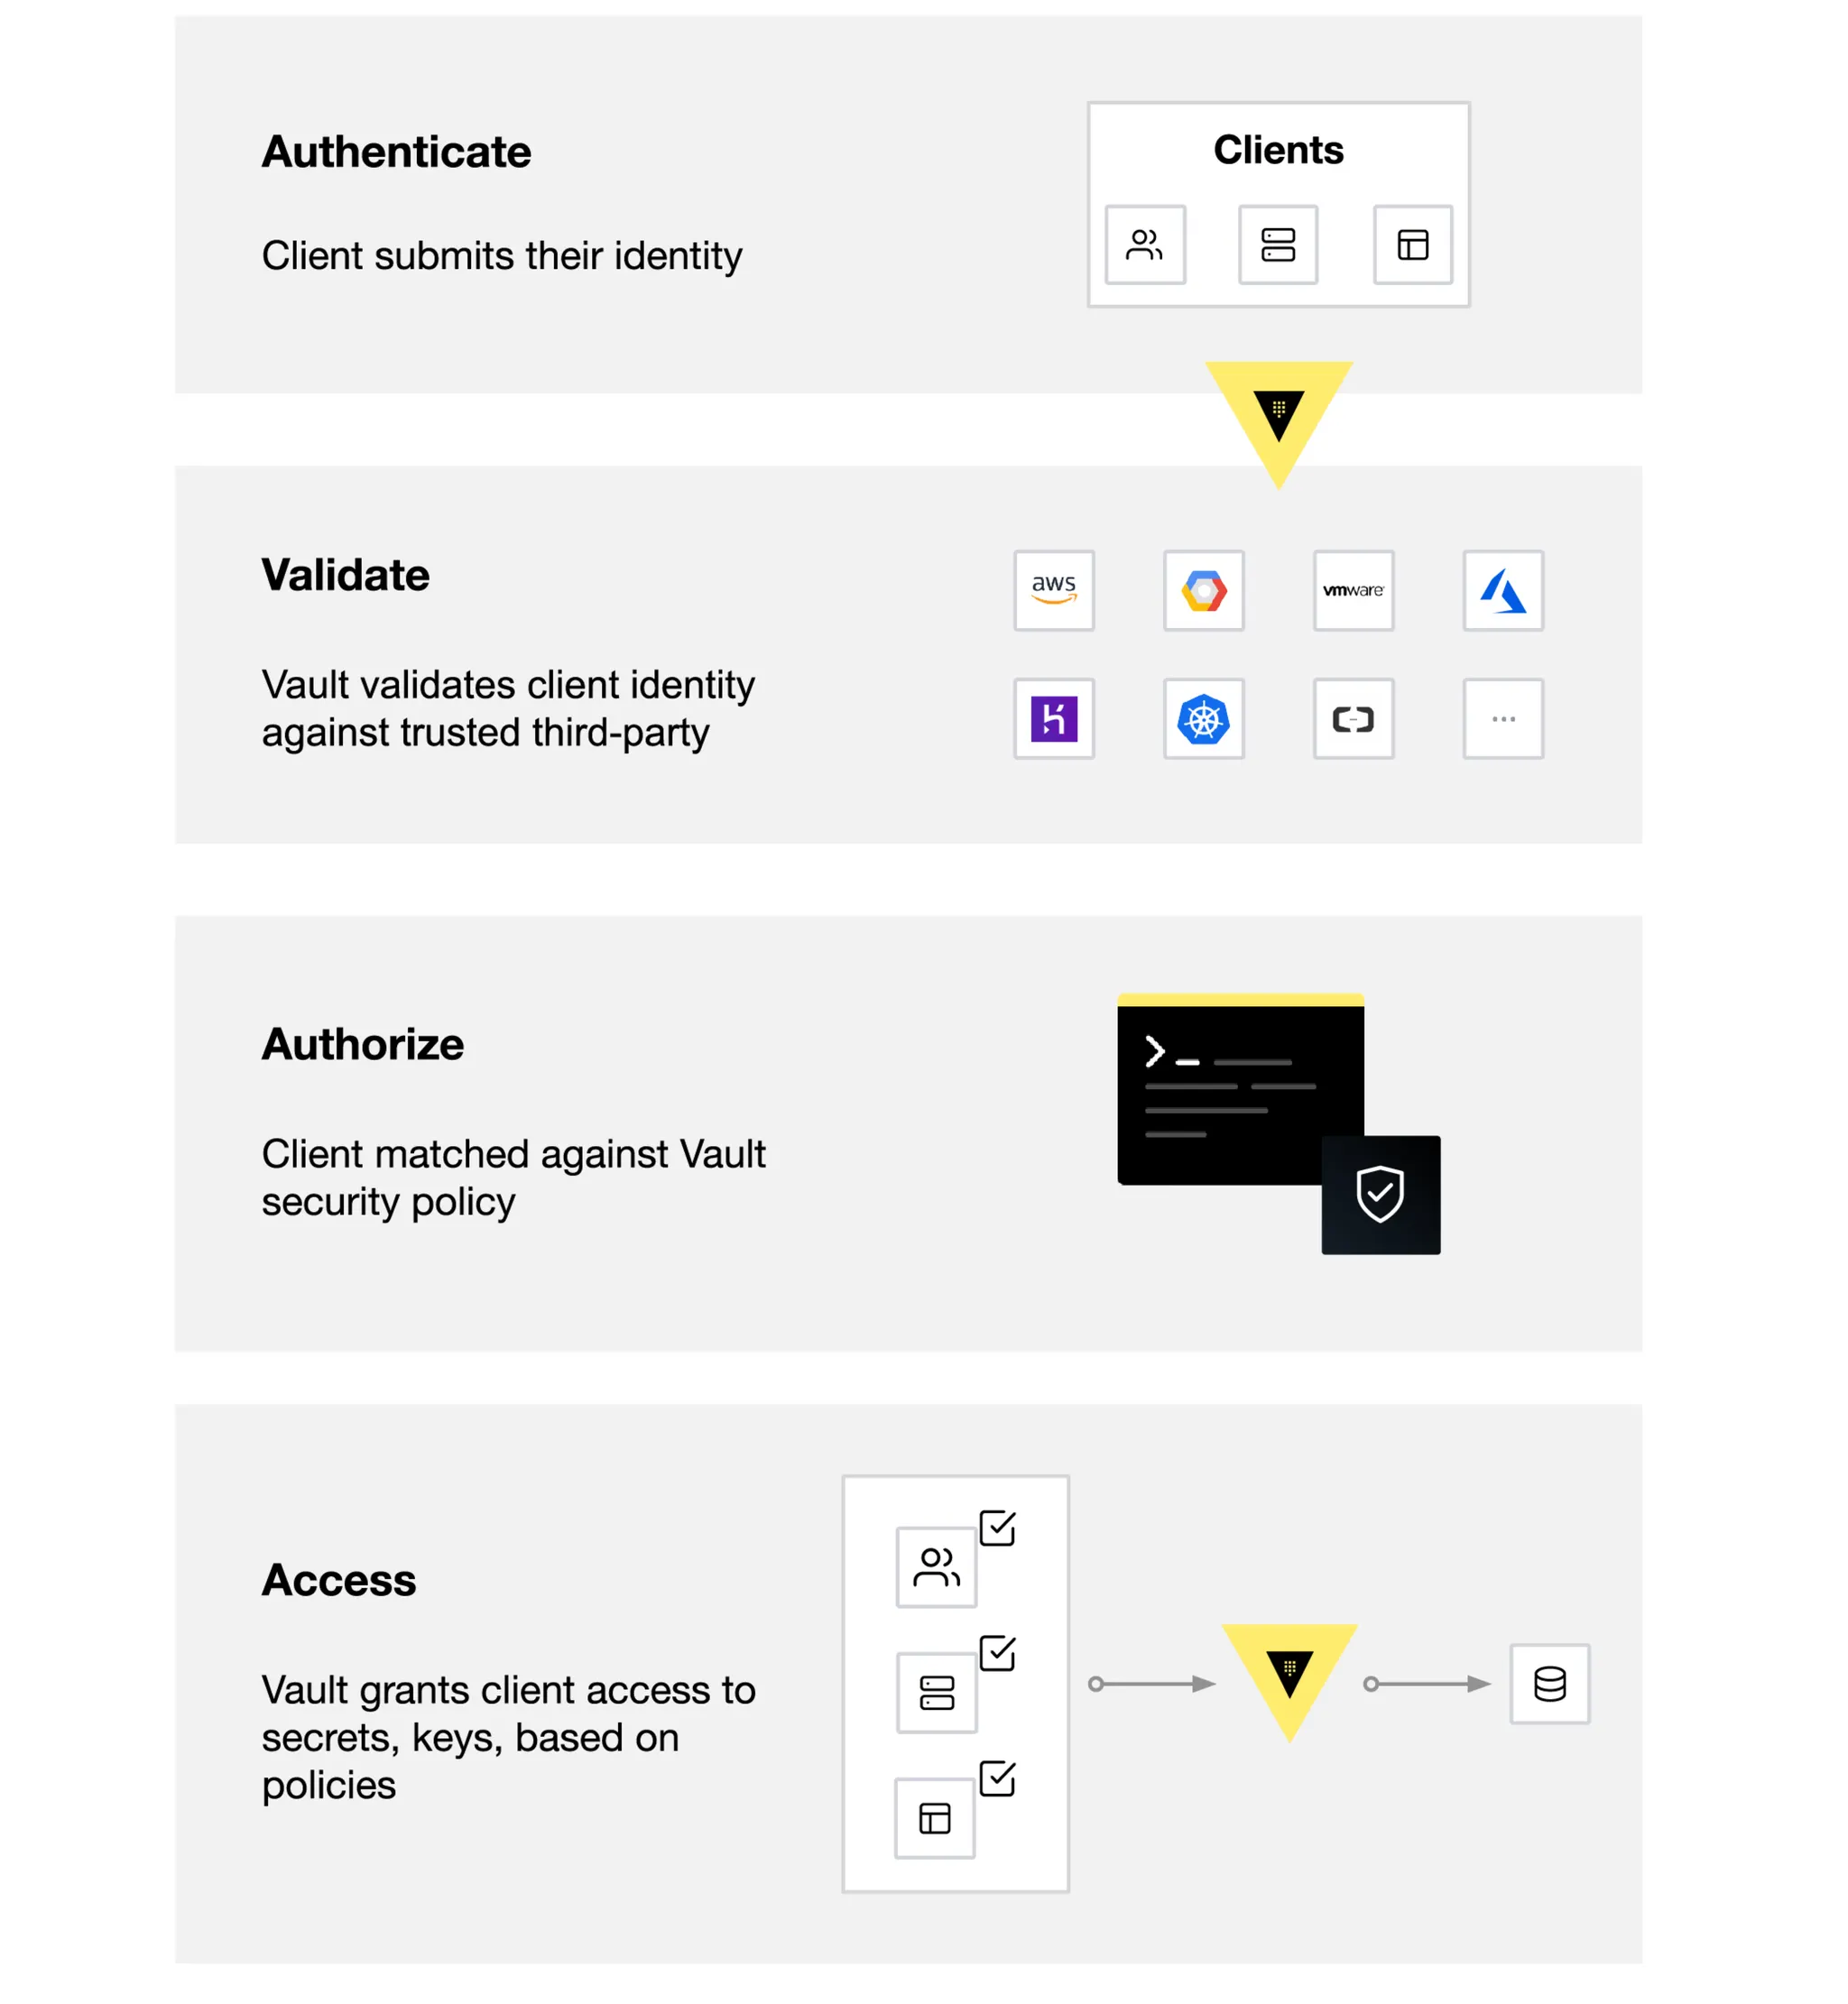
- Vault는 클라이언트(사용자, 기계, 애플리케이션 등)를 검증하고 인가한 후에만 비밀이나 저장된 민감한 데이터에 접근할 수 있도록 합니다.
Vault가 액세스를 제어하는 4가지 핵심 요소

1. 누가 (Who) : 인증 (Authentication)
가장 먼저, 접근하려는 대상이 **'신뢰할 수 있는 주체'**인지 확인합니다.
- 대상: 사람(개발자, 관리자)뿐만 아니라 애플리케이션, 시스템, 머신을 포함합니다.
- 방식: ID/PW, GitHub 토큰, K8s Service Account, AWS IAM 등 다양한 방식을 통해 신원을 검증합니다.
- Vault 역할: "너 누구니?"를 확인하고, 검증된 사용자에게 Vault를 사용할 수 있는 **토큰(Token)**을 발급합니다.
-> 인증을 받으면 토큰을 발급 받는다.
2. 무엇에 (What) : 대상 지정 (Target System)
인증된 사용자가 **'어떤 시스템'**에 접근해야 하는지 명확히 합니다.
- 대상 리소스: Database, Web Server, Object Storage(S3), Cloud Console 등 민감한 자산들.
- 기존의 문제: 각각의 시스템마다 ID/PW가 파편화되어 관리가 어려웠습니다.
- Vault 역할: 다양한 시스템(Secret Engine)에 접근할 수 있는 단일한 게이트웨이(Gateway) 역할을 수행합니다.
3. 얼마 동안 (How Long) : 접근 시간 제어 (TTL)
한번 발급된 권한이 영원히 유효하다면, 유출되었을 때 큰 보안 사고로 이어집니다.
- 핵심 개념: TTL (Time To Live, 유효 기간)
- 동작: "이 DB 접속 권한은 딱 1시간 동안만 유효해"라고 제한을 둡니다.
- Vault 역할: 영구적인 키 대신, 시간이 지나면 자동으로 만료되는 **임시 자격 증명(Lease)**을 발급합니다.
4. 라이프 사이클 (Lifecycle) : 자동화 (Automation)
사람이 수동으로 비밀번호를 만들고, 갱신하고, 폐기하는 것은 비효율적이며 실수할 위험이 큽니다.
- 접근 키 관리: 생성(Create) → 갱신(Renew) → 폐기(Revoke)의 과정을 자동화합니다.
- 동적 시크릿 (Dynamic Secrets): 사용자가 요청할 때 계정을 즉시 생성하고, 사용이 끝나면 즉시 삭제합니다 → Just in Time(JIT)
- Vault 역할: 관리자의 개입 없이 시스템이 알아서 키의 수명주기를 관리하여 운영 부담과 보안 위험을 동시에 줄입니다.
Vault의 동작 방식
- Vault는 주로 토큰(Token)을 기반으로 작동하며, 이 토큰은 클라이언트의 정책(Policy)과 연결되어 있습니다. 각 정책은 경로(path) 기반으로 설정되며, 정책 규칙은 클라이언트가 해당 경로에서 수행할 수 있는 작업과 접근 가능성을 제한합니다. Vault에서는 토큰을 수동으로 생성해 클라이언트에 할당할 수도 있고, 클라이언트가 로그인하여 토큰을 직접 획득할 수도 있습니다.
3. Kubernetes에 Vault 설치
Vault on Kubernets 설치
Step1. Helm을 사용한 Vault 배포
- 네임스페이스 생성 및 Helm Repo 추가
# Create a Kubernetes namespace.
kubectl create namespace vault

# View all resources in a namespace.
kubectl get all --namespace vault

# Setup Helm repo
helm repo add hashicorp https://helm.releases.hashicorp.com

# Check that you have access to the chart.
helm search repo hashicorp/vault

NAME                            	CHART VERSION	APP VERSION	DESCRIPTION
hashicorp/vault                 	0.31.0       	1.20.4     	Official HashiCorp Vault Chart
hashicorp/vault-secrets-gateway 	0.0.2        	0.1.0      	A Helm chart for Kubernetes
hashicorp/vault-secrets-operator	1.0.1        	1.0.1      	Official Vault Secrets Operator Chart
- Helm Chart 설정 Values 설정 및 배포
# vault-values-dev.yaml 생성
cat <<EOF > vault-values-dev.yaml
global:
  enabled: true
  tlsDisable: true

injector:
  enabled: true
  # Sidecar Injection을 위해 필요한 설정

server:
  dev:
    enabled: true
    devRootToken: "root" # 학습 편의를 위해 Root Token을 'root'로 고정

  # 데이터 영구 저장이 필요 없으므로 비활성화 (Dev모드는 메모리 사용)
  dataStorage:
    enabled: false

  # UI 활성화 및 NodePort 노출
  service:
    type: "NodePort"
    nodePort: 30000

  ui:
    enabled: true
EOF
# Helm Install 실행
(⎈|kind-myk8s:N/A) gaji:~$ helm upgrade vault hashicorp/vault -n vault -f vault-values-dev.yaml --install
Release "vault" does not exist. Installing it now.
NAME: vault
LAST DEPLOYED: Fri Nov 28 00:13:38 2025
NAMESPACE: vault
STATUS: deployed
REVISION: 1
NOTES:
Thank you for installing HashiCorp Vault!
Now that you have deployed Vault, you should look over the docs on using
Vault with Kubernetes available here:
https://developer.hashicorp.com/vault/docs
Your release is named vault. To learn more about the release, try:
$ helm status vault
$ helm get manifest vault
# 네임스페이스 변경 : vault
(⎈|kind-myk8s:N/A) gaji:~$ kubens vault
✔ Active namespace is "vault"
# 배포확인
(⎈|kind-myk8s:vault) gaji:~$ k get pods,svc,pvc
NAME READY STATUS RESTARTS AGE
pod/vault-0 1/1 Running 0 28s
pod/vault-agent-injector-556c5dd8fb-tb44d 0/1 ContainerCreating 0 28s
NAME TYPE CLUSTER-IP EXTERNAL-IP PORT(S) AGE
service/vault NodePort 10.96.100.114 <none> 8200:30000/TCP,8201:32237/TCP 28s
service/vault-agent-injector-svc ClusterIP 10.96.243.192 <none> 443/TCP 28s
service/vault-internal ClusterIP None <none> 8200/TCP,8201/TCP 28s
Step2. Vault 초기화 및 잠금해제
- 해당 과정은 Step3 진행 후 확인함
(⎈|kind-myk8s:vault) gaji:~$ kubectl exec -ti vault-0 -- vault status
Key             Value
---             -----
Seal Type       shamir
Initialized     true
Sealed          false
Total Shares    1
Threshold       1
Version         1.20.4
Build Date      2025-09-23T13:22:38Z
Storage Type    inmem
Cluster Name    vault-cluster-dad1ff35
Cluster ID      0e85b70c-2828-33cd-b601-c3d95be77761
HA Enabled      false
Step3. CLI 설정(WSL 2 Ubuntu)
# 1) 필수 패키지 설치
(⎈|kind-myk8s:vault) gaji:~$ sudo apt-get update
[sudo] password for gaji:
Hit:1 https://download.docker.com/linux/ubuntu noble InRelease
Hit:2 http://archive.ubuntu.com/ubuntu noble InRelease
Hit:3 http://ppa.launchpad.net/tektoncd/cli/ubuntu eoan InRelease
Hit:4 http://security.ubuntu.com/ubuntu noble-security InRelease
Hit:5 http://archive.ubuntu.com/ubuntu noble-updates InRelease
Hit:6 http://archive.ubuntu.com/ubuntu noble-backports InRelease
Reading package lists... Done

(⎈|kind-myk8s:vault) gaji:~$ sudo apt-get install -y gpg curl lsb-release
Reading package lists... Done
Building dependency tree... Done
Reading state information... Done
gpg is already the newest version (2.4.4-2ubuntu17.3).
gpg set to manually installed.
curl is already the newest version (8.5.0-2ubuntu10.6).
lsb-release is already the newest version (12.0-2).
lsb-release set to manually installed.
0 upgraded, 0 newly installed, 0 to remove and 122 not upgraded.


# 2) HashiCorp 공식 APT Repository 등록
# HashiCorp GPG Key 등록
(⎈|kind-myk8s:vault) gaji:~$ curl -fsSL https://apt.releases.hashicorp.com/gpg \
o gpg -->   | sudo gpg --dearmor -o /usr/share/keyrings/hashicorp-archive-keyring.gpg


# HashiCorp Repo 추가
(⎈|kind-myk8s:vault) gaji:~$ echo "deb [signed-by=/usr/share/keyrings/hashicorp-archive-keyring.gpg] \
pt.releases> https://apt.releases.hashicorp.com $(lsb_release -cs) main" \
 | sudo>   | sudo tee /etc/apt/sources.list.d/hashicorp.list
deb [signed-by=/usr/share/keyrings/hashicorp-archive-keyring.gpg] https://apt.releases.hashicorp.com noble main


# 3) Vault 설치
(⎈|kind-myk8s:vault) gaji:~$ sudo apt-get update
Get:1 https://apt.releases.hashicorp.com noble InRelease [12.9 kB]
Hit:2 https://download.docker.com/linux/ubuntu noble InRelease
Get:3 https://apt.releases.hashicorp.com noble/main amd64 Packages [211 kB]
Hit:4 http://security.ubuntu.com/ubuntu noble-security InRelease
Hit:5 http://ppa.launchpad.net/tektoncd/cli/ubuntu eoan InRelease
Hit:6 http://archive.ubuntu.com/ubuntu noble InRelease
Hit:7 http://archive.ubuntu.com/ubuntu noble-updates InRelease
Hit:8 http://archive.ubuntu.com/ubuntu noble-backports InRelease
Fetched 224 kB in 1s (177 kB/s)
Reading package lists... Done

(⎈|kind-myk8s:vault) gaji:~$ sudo apt-get install -y vault
Reading package lists... Done
Building dependency tree... Done
Reading state information... Done
The following NEW packages will be installed:
  vault
0 upgraded, 1 newly installed, 0 to remove and 122 not upgraded.
Need to get 169 MB of archives.
After this operation, 512 MB of additional disk space will be used.
Get:1 https://apt.releases.hashicorp.com noble/main amd64 vault amd64 1.21.1-1 [169 MB]
Fetched 169 MB in 8s (20.8 MB/s)
Selecting previously unselected package vault.
(Reading database ... 61059 files and directories currently installed.)
Preparing to unpack .../vault_1.21.1-1_amd64.deb ...
Unpacking vault (1.21.1-1) ...
Setting up vault (1.21.1-1) ...
Generating Vault TLS key and self-signed certificate...
.....+.+...+++++++++++++++++++++++++++++++++++++++++++++++++++++++++++++++++*...........+............+..+...+.......+++++++++++++++++++++++++++++++++++++++++++++++++++++++++++++++++*..+......+.....+...+..........+..+...+....+.....+..........+..+................+..+......+..........+......+........+......+......+...+..........+...........+....+......+..+.......+......+..+.......+........+....+......+.........+......+..+.+..+...+.......+............+...+..............+..........+...+.....+......+.+......+..+.+......+......+..............+...+.+..............+............................+++++++++++++++++++++++++++++++++++++++++++++++++++++++++++++++++
.+..........+..+...+............+....+...+..+..........+...+.....+...+....+...+...+..+.......+...........+...+.+......+..+...+....+.....+++++++++++++++++++++++++++++++++++++++++++++++++++++++++++++++++*.+.....+.+..............+......+.......+......+..+.............+.........+.....+.......+......+...+.....+.......+..+...+++++++++++++++++++++++++++++++++++++++++++++++++++++++++++++++++*..+.........+...+...............+.....+.+...............+......+......+..+.......+......+..+.......+......+.....+...+.+...+..+..........+...+....................+..........+.....+...+...+....+......+..+...+....+..+.........+.+......+.....+.......+.....+......+....+...........+......+..........+...+.....+.......+........+.+............+...+....................+.+...........+...+.+....................+.+.....+.........+................+........+.+...+..+..................+...+..........+.........+.....+...............+......+....+........+....................................+.+.....................+.....+.........+....+.....+....+.................+..........+...............+.........+...................................+.......+...+..............+.+.........+..+....+.........+......+...........+...+......+.+.....+...+......+......+................+...+..............+...............+...+....+........+...+.......+...+..+............+.+............+...+.........+.....+....+.....+....+............+.....+++++++++++++++++++++++++++++++++++++++++++++++++++++++++++++++++
-----
Vault TLS key and self-signed certificate have been generated in '/opt/vault/tls'.


# 4) 설치 확인
(⎈|kind-myk8s:vault) gaji:~$ vault --version
Vault v1.21.1 (2453aac2638a6ae243341b4e0657fd8aea1cbf18), built 2025-11-18T13:04:32Z


# 5) Vault 주소 설정 (NodePort 30000 사용)
(⎈|kind-myk8s:vault) gaji:~$ export VAULT_ADDR='http://localhost:30000'


# 6) Vault 상태 확인
(⎈|kind-myk8s:vault) gaji:~$ vault status
Key             Value
---             -----
Seal Type       shamir
Initialized     true
Sealed          false
Total Shares    1
Threshold       1
Version         1.20.4
Build Date      2025-09-23T13:22:38Z
Storage Type    inmem
Cluster Name    vault-cluster-dad1ff35
Cluster ID      0e85b70c-2828-33cd-b601-c3d95be77761
HA Enabled      false


# 7) Root Token으로 로그인
(⎈|kind-myk8s:vault) gaji:~$ vault login
Token (will be hidden):     ### "root"라고 넣으면 됨
Success! You are now authenticated. The token information displayed below
is already stored in the token helper. You do NOT need to run "vault login"
again. Future Vault requests will automatically use this token.

Key                  Value
---                  -----
token                root
token_accessor       60JyyEGoRUTAygUAU6FKVL7m
token_duration       ∞
token_renewable      false
token_policies       ["root"]
identity_policies    []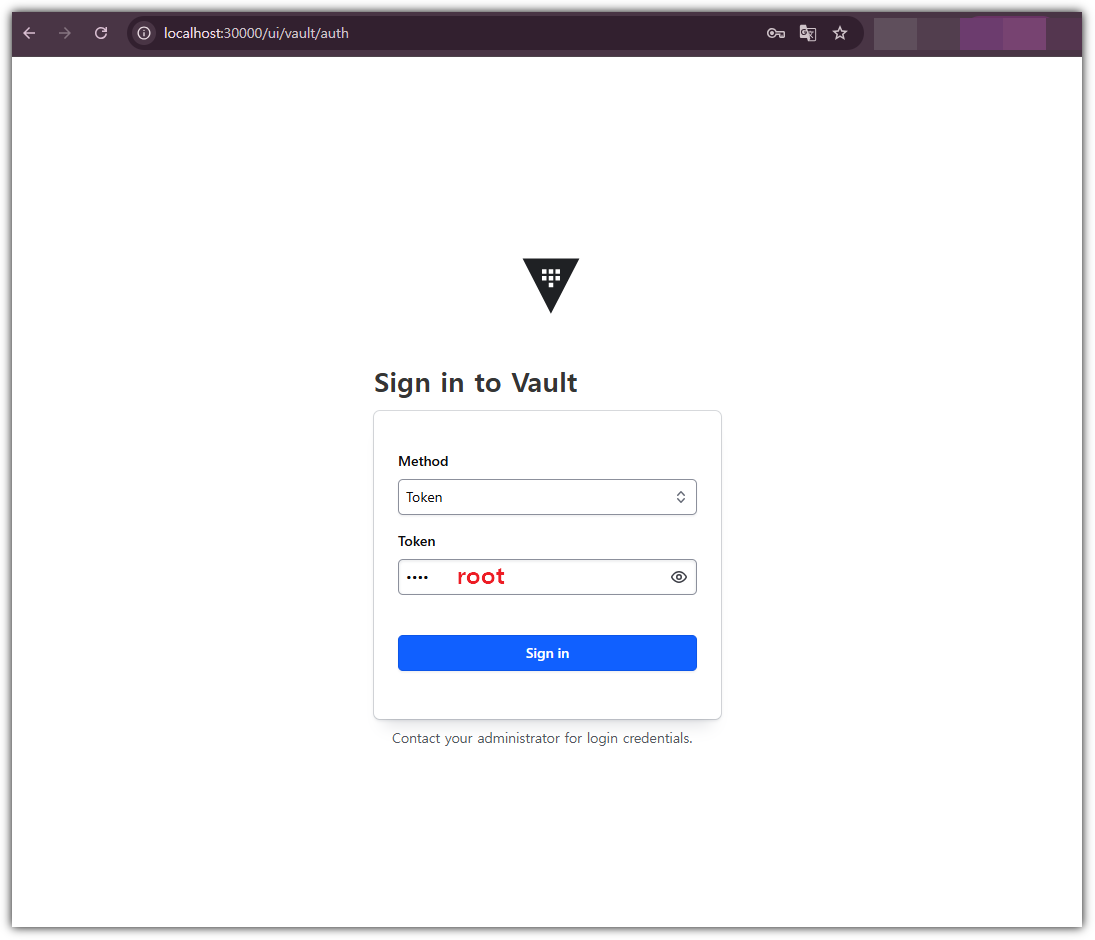
policies ["root"]- UI 접속 확인 - http://localhost:30000

KV 시크릿 엔진 활성화 및 샘플 구성 → 정적 시크릿(Static Secret)
- Vault KV version 2 엔진을 활성화하고 샘플 데이터를 저장합니다.
→ Version1 : KV 버전관리 불가 / Version2 : KV 버전관리 가능
Step 1. KV 엔진 활성화 및 샘플 데이터 추가
# 활성화된 시크렛 엔진 목록 조회
(⎈|kind-myk8s:vault) gaji:~$ vault secrets list
Path Type Accessor Description
---- ---- -------- -----------
cubbyhole/ cubbyhole cubbyhole_681de85c per-token private secret storage
identity/ identity identity_9a7d3410 identity store
secret/ kv kv_939d5550 key/value secret storage
sys/ system system_d3518f05 system endpoints used for control, policy and debugging
# KV v2 형태로 엔진 활성화하기 위한 명령은 다음과 같지만 Dev 모드에서 활성화 되어있음.
# vault secrets enable -path=secret kv-v2
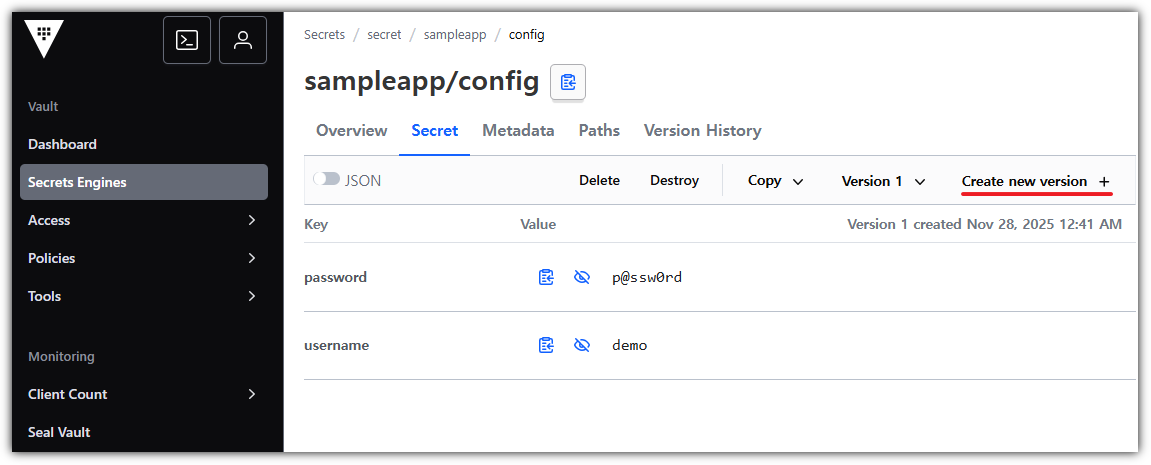
# 샘플 시크릿 저장 (경로: secret/sampleapp/config)
(⎈|kind-myk8s:vault) gaji:~$ vault kv put secret/sampleapp/config \
use> username="demo" \
> password="p@ssw0rd"
======== Secret Path ========
secret/data/sampleapp/config
======= Metadata =======
Key Value
--- -----
created_time 2025-11-27T15:41:47.625472441Z
custom_metadata <nil>
deletion_time n/a
destroyed false
version 1
# 입력된 데이터 확인
(⎈|kind-myk8s:vault) gaji:~$ vault kv get secret/sampleapp/config
======== Secret Path ========
secret/data/sampleapp/config
======= Metadata =======
Key Value
--- -----
created_time 2025-11-27T15:41:47.625472441Z
custom_metadata <nil>
deletion_time n/a
destroyed false
version 1
====== Data ======
Key Value
--- -----
password p@ssw0rd
username demo
→ 여기서 Current version은 V2 엔진의 키의 버전 관리를 의미한다.

→ 이후에 'Create new version'으로 password 등의 값을 변경해 볼 예정!
- Secret 경로 확인


Vault Agent와 Sidecar 패턴
Step1. Vault AppRole 방식 인증 구성
- 인증 구성 및 정책 적용
# 1. AppRole 인증 방식 활성화
(⎈|kind-myk8s:vault) gaji:~$ vault auth list
Path      Type     Accessor               Description                Version
----      ----     --------               -----------                -------
token/    token    auth_token_1aea2d74    token based credentials    n/a


(⎈|kind-myk8s:vault) gaji:~$ vault auth enable approle || echo "AppRole already enabled"
Success! Enabled approle auth method at: approle/

(⎈|kind-myk8s:vault) gaji:~$ vault auth list
Path        Type       Accessor                 Description                Version
----        ----       --------                 -----------                -------
approle/    approle    auth_approle_938ea8f6    n/a                        n/a
token/      token      auth_token_1aea2d74      token based credentials    n/a


# 2. 정책 생성
vault policy write sampleapp-policy - <<EOF
path "secret/data/sampleapp/*" {
  capabilities = ["read"]
}
EOF

# 3. AppRole Role 생성 - 앞서 생성한 정책(sampleapp-policy) 연결
vault write auth/approle/role/sampleapp-role \
  token_policies="sampleapp-policy" \
  secret_id_ttl="1h" \
  token_ttl="1h" \
  token_max_ttl="4h"

# 4. Role ID 및 Secret ID 추출 및 저장
ROLE_ID=$(vault read -field=role_id auth/approle/role/sampleapp-role/role-id)
SECRET_ID=$(vault write -f -field=secret_id auth/approle/role/sampleapp-role/secret-id)

(⎈|kind-myk8s:vault) gaji:~$ echo "ROLE_ID: $ROLE_ID"
ROLE_ID: bf3ddf8a-8312-d918-b1db-f0e432a47c01
(⎈|kind-myk8s:vault) gaji:~$ echo "SECRET_ID: $SECRET_ID"
SECRET_ID: 58eb0d41-663f-4fa3-4e1b-5d79b9f6cbde


# 5. 파일로 저장
mkdir -p approle-creds
echo "$ROLE_ID" > approle-creds/role_id.txt
echo "$SECRET_ID" > approle-creds/secret_id.txt


(⎈|kind-myk8s:vault) gaji:~$ cat approle-creds/role_id.txt
bf3ddf8a-8312-d918-b1db-f0e432a47c01
(⎈|kind-myk8s:vault) gaji:~$ cat approle-creds/secret_id.txt
58eb0d41-663f-4fa3-4e1b-5d79b9f6cbde


# 6. Kubernetes Secret으로 저장 (Agent 인증시 AppRole Role ID, Secret ID 사용)
kubectl create secret generic vault-approle -n vault \
  --from-literal=role_id="${ROLE_ID}" \
  --from-literal=secret_id="${SECRET_ID}" \
  --save-config \
  --dry-run=client -o yaml | kubectl apply -f -
Step2. Vault Agent Sidecar 연동
- Vault Agent는 vault-agent-config.hcl 설정을 통해 연결할 Vault의 정보와, Template 구성, 렌더링 주기, 참조할 Vault KV 위치정보 등을 정의한다.
- Vault Agent 설정 파일 작성 및 생성 ( vault-agent-config.hcl) - HCL(HashiCorp Configuration Language)
cat <<EOF | kubectl create configmap vault-agent-config -n vault --from-file=agent-config.hcl=/dev/stdin --dry-run=client -o yaml | kubectl apply -f -
vault {
  address = "http://vault.vault.svc:8200"
}

auto_auth {
  method "approle" {
    config = {
      role_id_file_path = "/etc/vault/approle/role_id"
      secret_id_file_path = "/etc/vault/approle/secret_id"
      remove_secret_id_file_after_reading = false
    }
  }

  sink "file" {
    config = {
      path = "/etc/vault-agent-token/token"
    }
  }
}

template_config {
  static_secret_render_interval = "20s"
}

template {
  destination = "/etc/secrets/index.html"
  contents = <<EOH
  <html>
  <body>
    <p>username: {{ with secret "secret/data/sampleapp/config" }}{{ .Data.data.username }}{{ end }}</p>
    <p>password: {{ with secret "secret/data/sampleapp/config" }}{{ .Data.data.password }}{{ end }}</p>
  </body>
  </html>
EOH
}
EOF
2. 샘플 애플리케이션 + Sidecar 배포 (수동방식)
- Nginx + Vault Agent 생성
kubectl apply -n vault -f - <<EOF
apiVersion: apps/v1
kind: Deployment
metadata:
  name: nginx-vault-demo
spec:
  replicas: 1
  selector:
    matchLabels:
      app: nginx-vault-demo
  template:
    metadata:
      labels:
        app: nginx-vault-demo
    spec:
      containers:
      - name: nginx
        image: nginx:latest
        ports:
        - containerPort: 80
        volumeMounts:
        - name: html-volume
          mountPath: /usr/share/nginx/html
      - name: vault-agent-sidecar
        image: hashicorp/vault:latest
        args:
          - "agent"
          - "-config=/etc/vault/agent-config.hcl"
        volumeMounts:
        - name: vault-agent-config
          mountPath: /etc/vault
        - name: vault-approle
          mountPath: /etc/vault/approle
        - name: vault-token
          mountPath: /etc/vault-agent-token
        - name: html-volume
          mountPath: /etc/secrets
      volumes:
      - name: vault-agent-config
        configMap:
          name: vault-agent-config
      - name: vault-approle
        secret:
          secretName: vault-approle
      - name: vault-token
        emptyDir: {}
      - name: html-volume
        emptyDir: {}
EOF
3. SVC 생성
kubectl apply -f - <<EOF
apiVersion: v1
kind: Service
metadata:
  name: nginx-service
spec:
  type: NodePort
  selector:
    app: nginx-vault-demo
  ports:
    - protocol: TCP
      port: 80
      targetPort: 80
      nodePort: 30001 # Kind에서 설정한 Port
EOF
4. 생성된 컨테이너 확인
# 파드 내에 사이드카 컨테이너 추가되어 2/2 확인
(⎈|kind-myk8s:vault) gaji:~$ kubectl get pod -l app=nginx-vault-demo
NAME                                READY   STATUS    RESTARTS   AGE
nginx-vault-demo-7776649597-lpcbz   2/2     Running   0          50s


(⎈|kind-myk8s:vault) gaji:~$ kubectl describe pod -l app=nginx-vault-demo
Name:             nginx-vault-demo-7776649597-lpcbz
Namespace:        vault
Priority:         0
Service Account:  default
Node:             myk8s-control-plane/172.18.0.2
Start Time:       Fri, 28 Nov 2025 23:13:08 +0900
Labels:           app=nginx-vault-demo
                  pod-template-hash=7776649597
Annotations:      <none>
Status:           Running
IP:               10.244.0.7
IPs:
  IP:           10.244.0.7
Controlled By:  ReplicaSet/nginx-vault-demo-7776649597
Containers:
  nginx:
    Container ID:   containerd://4c630c0a31c7bedf7b7236a0a7de2fe97fa671744f6def176f5aaa37db884294
    Image:          nginx:latest
    Image ID:       docker.io/library/nginx@sha256:553f64aecdc31b5bf944521731cd70e35da4faed96b2b7548a3d8e2598c52a42
    Port:           80/TCP
    Host Port:      0/TCP
    State:          Running
      Started:      Fri, 28 Nov 2025 23:13:19 +0900
    Ready:          True
    Restart Count:  0
    Environment:    <none>
    Mounts:
      /usr/share/nginx/html from html-volume (rw)
      /var/run/secrets/kubernetes.io/serviceaccount from kube-api-access-cwlmr (ro)
  vault-agent-sidecar:
    Container ID:  containerd://11328b34ba6e6e40afdb3890836dab2434aac278eb7e47e06febdde161999cab
    Image:         hashicorp/vault:latest
    Image ID:      docker.io/hashicorp/vault@sha256:f4e2687b72858a9e2160c344c9fa1ef74c07f21a89a8c00534ab64d3f187b927
    Port:          <none>
    Host Port:     <none>
    Args:
      agent
      -config=/etc/vault/agent-config.hcl
    State:          Running
      Started:      Fri, 28 Nov 2025 23:13:39 +0900
    Ready:          True
    Restart Count:  0
    Environment:    <none>
    Mounts:
      /etc/secrets from html-volume (rw)
      /etc/vault from vault-agent-config (rw)
      /etc/vault-agent-token from vault-token (rw)
      /etc/vault/approle from vault-approle (rw)
      /var/run/secrets/kubernetes.io/serviceaccount from kube-api-access-cwlmr (ro)
Conditions:
  Type                        Status
  PodReadyToStartContainers   True
  Initialized                 True
  Ready                       True
  ContainersReady             True
  PodScheduled                True
Volumes:
  vault-agent-config:
    Type:      ConfigMap (a volume populated by a ConfigMap)
    Name:      vault-agent-config
    Optional:  false
  vault-approle:
    Type:        Secret (a volume populated by a Secret)
    SecretName:  vault-approle
    Optional:    false
  vault-token:
    Type:       EmptyDir (a temporary directory that shares a pod's lifetime)
    Medium:
    SizeLimit:  <unset>
  html-volume:
    Type:       EmptyDir (a temporary directory that shares a pod's lifetime)
    Medium:
    SizeLimit:  <unset>
  kube-api-access-cwlmr:
    Type:                    Projected (a volume that contains injected data from multiple sources)
    TokenExpirationSeconds:  3607
    ConfigMapName:           kube-root-ca.crt
    Optional:                false
    DownwardAPI:             true
QoS Class:                   BestEffort
Node-Selectors:              <none>
Tolerations:                 node.kubernetes.io/not-ready:NoExecute op=Exists for 300s
                             node.kubernetes.io/unreachable:NoExecute op=Exists for 300s
Events:
  Type    Reason     Age   From               Message
  ----    ------     ----  ----               -------
  Normal  Scheduled  66s   default-scheduler  Successfully assigned vault/nginx-vault-demo-7776649597-lpcbz to myk8s-control-plane
  Normal  Pulling    66s   kubelet            Pulling image "nginx:latest"
  Normal  Pulled     55s   kubelet            Successfully pulled image "nginx:latest" in 9.474s (9.474s including waiting). Image size: 59772801 bytes.
  Normal  Created    55s   kubelet            Created container: nginx
  Normal  Started    55s   kubelet            Started container nginx
  Normal  Pulling    55s   kubelet            Pulling image "hashicorp/vault:latest"
  Normal  Pulled     35s   kubelet            Successfully pulled image "hashicorp/vault:latest" in 19.59s (19.59s including waiting). Image size: 178936061 bytes.
  Normal  Created    35s   kubelet            Created container: vault-agent-sidecar
  Normal  Started    35s   kubelet            Started container vault-agent-sidecar


# mutating admission
(⎈|kind-myk8s:vault) gaji:~$ kubectl get mutatingwebhookconfigurations.admissionregistration.k8s.io
NAME                       WEBHOOKS   AGE
vault-agent-injector-cfg   1          23h


# vault agent 확인
(⎈|kind-myk8s:vault) gaji:~$ kubectl  exec -it -n vault deploy/nginx-vault-demo -c vault-agent-sidecar -- vault agent -h
Usage: vault agent [options]

  This command starts a Vault Agent that can perform automatic authentication
  in certain environments.

  Start an agent with a configuration file:

      $ vault agent -config=/etc/vault/config.hcl

  For a full list of examples, please see the documentation.

HTTP Options:

  -address=<string>
      Address of the Vault server. The default is https://127.0.0.1:8200. This
      can also be specified via the VAULT_ADDR environment variable.

  -agent-address=<string>
      Address of the Agent. This can also be specified via the
      VAULT_AGENT_ADDR environment variable.

  -ca-cert=<string>
      Path on the local disk to a single PEM-encoded CA certificate to verify
      the Vault server's SSL certificate. This takes precedence over -ca-path.
      This can also be specified via the VAULT_CACERT environment variable.

  -ca-path=<string>
      Path on the local disk to a directory of PEM-encoded CA certificates to
      verify the Vault server's SSL certificate. This can also be specified
      via the VAULT_CAPATH environment variable.

  -client-cert=<string>
      Path on the local disk to a single PEM-encoded CA certificate to use
      for TLS authentication to the Vault server. If this flag is specified,
      -client-key is also required. This can also be specified via the
      VAULT_CLIENT_CERT environment variable.

  -client-key=<string>
      Path on the local disk to a single PEM-encoded private key matching the
      client certificate from -client-cert. This can also be specified via the
      VAULT_CLIENT_KEY environment variable.

  -disable-redirects
      Disable the default client behavior, which honors a single redirect
      response from a request The default is false. This can also be specified
      via the VAULT_DISABLE_REDIRECTS environment variable.

  -header=<key=value>
      Key-value pair provided as key=value to provide http header added to any
      request done by the CLI.Trying to add headers starting with 'X-Vault-'
      is forbidden and will make the command fail This can be specified
      multiple times.

  -mfa=<string>
      Supply MFA credentials as part of X-Vault-MFA header. This can also be
      specified via the VAULT_MFA environment variable.

  -namespace=<string>
      The namespace to use for the command. Setting this is not necessary
      but allows using relative paths. -ns can be used as shortcut. The
      default is (not set). This can also be specified via the VAULT_NAMESPACE
      environment variable.

  -non-interactive
      When set true, prevents asking the user for input via the terminal. The
      default is false.

  -output-curl-string
      Instead of executing the request, print an equivalent cURL command
      string and exit. The default is false.

  -output-policy
      Instead of executing the request, print an example HCL policy that would
      be required to run this command, and exit. The default is false.

  -policy-override
      Override a Sentinel policy that has a soft-mandatory enforcement_level
      specified The default is false.

  -tls-server-name=<string>
      Name to use as the SNI host when connecting to the Vault server via TLS.
      This can also be specified via the VAULT_TLS_SERVER_NAME environment
      variable.

  -tls-skip-verify
      Disable verification of TLS certificates. Using this option is highly
      discouraged as it decreases the security of data transmissions to and
      from the Vault server. The default is false. This can also be specified
      via the VAULT_SKIP_VERIFY environment variable.

  -unlock-key=<string>
      Key to unlock a namespace API lock. The default is (not set).

  -wrap-ttl=<duration>
      Wraps the response in a cubbyhole token with the requested TTL. The
      response is available via the "vault unwrap" command. The TTL is
      specified as a numeric string with suffix like "30s" or "5m". This can
      also be specified via the VAULT_WRAP_TTL environment variable.

Command Options:

  -config=<string>
      Path to a configuration file. This configuration file should contain
      only agent directives.

  -exit-after-auth
      If set to true, the agent will exit with code 0 after a single
      successful auth, where success means that a token was retrieved and all
      sinks successfully wrote it The default is false.

  -log-file=<string>
      Path to the log file that Vault should use for logging

  -log-format=<string>
      Log format. Supported values are "standard" and "json". The default
      is (not set). This can also be specified via the VAULT_LOG_FORMAT
      environment variable.

  -log-level=<string>
      Log verbosity level. Supported values (in order of detail) are "trace",
      "debug", "info", "warn", and "error". The default is (not set). This can
      also be specified via the VAULT_LOG_LEVEL environment variable.

  -log-rotate-bytes=<int>
      Number of bytes that should be written to a log before it needs to be
      rotated. Unless specified, there is no limit to the number of bytes that
      can be written to a log file

  -log-rotate-duration=<string>
      The maximum duration a log should be written to before it needs to be
      rotated. Must be a duration value such as 30s

  -log-rotate-max-files=<int>
      The maximum number of older log file archives to keep

Subcommands:
    generate-config    Generate a Vault Agent configuration file.


# 마운트된 파일들 확인
(⎈|kind-myk8s:vault) gaji:~$ kubectl  exec -it -n vault deploy/nginx-vault-demo -c vault-agent-sidecar -- cat /etc/vault/agent-config.hcl
vault {
  address = "http://vault.vault.svc:8200"
}

auto_auth {
  method "approle" {
    config = {
      role_id_file_path = "/etc/vault/approle/role_id"
      secret_id_file_path = "/etc/vault/approle/secret_id"
      remove_secret_id_file_after_reading = false
    }
  }

  sink "file" {
    config = {
      path = "/etc/vault-agent-token/token"
    }
  }
}

template_config {
  static_secret_render_interval = "20s"
}

template {
  destination = "/etc/secrets/index.html"
  contents = <<EOH
  <html>
  <body>
    <p>username: {{ with secret "secret/data/sampleapp/config" }}{{ .Data.data.username }}{{ end }}</p>
    <p>password: {{ with secret "secret/data/sampleapp/config" }}{{ .Data.data.password }}{{ end }}</p>
  </body>
  </html>
EOH
}


(⎈|kind-myk8s:vault) gaji:~$ kubectl  exec -it -n vault deploy/nginx-vault-demo -c vault-agent-sidecar -- ls -l /etc/vault/approle
total 0
lrwxrwxrwx    1 root     root            14 Nov 28 14:13 role_id -> ..data/role_id
lrwxrwxrwx    1 root     root            16 Nov 28 14:13 secret_id -> ..data/secret_id


(⎈|kind-myk8s:vault) gaji:~$ kubectl  exec -it -n vault deploy/nginx-vault-demo -c vault-agent-sidecar -- cat /etc/vault/approle/role_id
bf3ddf8a-8312-d918-b1db-f0e432a47c01

(⎈|kind-myk8s:vault) gaji:~$ kubectl  exec -it -n vault deploy/nginx-vault-demo -c vault-agent-sidecar -- cat /etc/vault/approle/secret_id
58eb0d41-663f-4fa3-4e1b-5d79b9f6cbde


# 렌더링 완료된 최종 index.html 확인
(⎈|kind-myk8s:vault) gaji:~$ kubectl exec -it -n vault deploy/nginx-vault-demo -c nginx -- ls -l /usr/share/nginx/html
total 4
-rw-r--r-- 1 100 1000 94 Nov 28 14:13 index.html


(⎈|kind-myk8s:vault) gaji:~$ kubectl exec -it -n vault deploy/nginx-vault-demo -c nginx -- cat /usr/share/nginx/html/index.html
  <html>
  <body>
    <p>username: demo</p>
    <p>password: p@ssw0rd</p>
  </body>
  </html>
5. KV 값 변경 후 확인


Annotation을 활용한 Vault Sidecar Injection
- Vault의 Kubernetes 인증 활성화 및 구성
# Kubernetes Auth Method 활성화
(⎈|kind-myk8s:vault) gaji:~$ vault auth enable kubernetes
Success! Enabled kubernetes auth method at: kubernetes/

(⎈|kind-myk8s:vault) gaji:~$ vault auth list
Path           Type          Accessor                    Description                Version
----           ----          --------                    -----------                -------
approle/       approle       auth_approle_938ea8f6       n/a                        n/a
kubernetes/    kubernetes    auth_kubernetes_a66763dc    n/a                        n/a
token/         token         auth_token_1aea2d74         token based credentials    n/a


# Kubernetes Auth Config 설정 (최신 방식)
# Service Account관련 Secrets을 자동으로 생성하려면? - Helm Chart Values
(⎈|kind-myk8s:vault) gaji:~$ TOKEN=$(kubectl create token vault -n vault)
$(kubectl config view --raw --minify --flatten -o jsonpath='{.clusters[0].cluster.certificate-authority-data}' | base64 --decode)
(⎈|kind-myk8s:vault) gaji:~$ CA_CERT=$(kubectl config view --raw --minify --flatten -o jsonpath='{.clusters[0].cluster.certificate-authority-data}' | base64 --decode)

vault write auth/kubernetes/config \
  token_reviewer_jwt="$TOKEN" \
  kubernetes_host="https://kubernetes.default.svc.cluster.local" \
  kubernetes_ca_cert="$CA_CERT" \
  issuer="https://kubernetes.default.svc.cluster.local" \
  disable_iss_validation=false


# Role 생성 (Injector가 로그인할 수 있도록)
vault write auth/kubernetes/role/sampleapp-role \
    bound_service_account_names="vault-ui-sa" \
    bound_service_account_namespaces="vault" \
    policies="sampleapp-policy" \
    ttl="24h" \
    audience="https://kubernetes.default.svc.cluster.local"
- deployment 배포
cat <<EOF | kubectl apply -f -
apiVersion: v1
kind: ServiceAccount
metadata:
  name: vault-ui-sa
  namespace: vault
---
apiVersion: apps/v1
kind: Deployment
metadata:
  name: vault-injected-ui
  namespace: vault
spec:
  replicas: 1
  selector:
    matchLabels:
      app: vault-injected-ui
  template:
    metadata:
      labels:
        app: vault-injected-ui
      annotations:
        vault.hashicorp.com/agent-inject: "true"
        vault.hashicorp.com/role: "sampleapp-role"
        vault.hashicorp.com/agent-inject-secret-config.json: "secret/data/sampleapp/config"
        vault.hashicorp.com/agent-inject-template-config.json: |
          {{- with secret "secret/data/sampleapp/config" -}}
          {
            "username": "{{ .Data.data.username }}",
            "password": "{{ .Data.data.password }}"
          }
          {{- end }}
        vault.hashicorp.com/agent-inject-output-path: "/vault/secrets"
    spec:
      serviceAccountName: vault-ui-sa
      containers:
      - name: app
        image: python:3.10
        ports:
        - containerPort: 5000
        command: ["sh", "-c"]
        args:
          - |
            pip install flask && cat <<PYEOF > /app.py
            import json, time
            from flask import Flask, render_template_string
            app = Flask(__name__)
            while True:
                try:
                    with open("/vault/secrets/config.json") as f:
                        secret = json.load(f)
                    break
                except:
                    time.sleep(1)
            @app.route("/")
            def index():
                return render_template_string("<h2>🔐 Vault Injected UI</h2><p>👤 사용자: {{username}}</p><p>🔑 비밀번호: {{password}}</p>", **secret)
            app.run(host="0.0.0.0", port=5000)
            PYEOF
            python /app.py
---
apiVersion: v1
kind: Service
metadata:
  name: vault-injected-ui
  namespace: vault
spec:
  type: NodePort
  ports:
    - port: 5000
      targetPort: 5000
      nodePort: 30002
  selector:
    app: vault-injected-ui
EOF
- init 컨테이너에서 service account token 에 정보 확인
# 단, init 과정 완료 시에는 해당 컨테이너가 종료되니, 파드 기동 후에는 아래 app 컨테이너로 확인 할 것
(⎈|kind-myk8s:vault) gaji:~$ kubectl exec -n vault -it deploy/vault-injected-ui -c app -- cat /var/run/secrets/kubernetes.io/serviceaccount/token | cut -d '.' -f2 | base64 -d| jq
{
  "aud": [
    "https://kubernetes.default.svc.cluster.local"
  ],
  "exp": 1795876110,
  "iat": 1764340110,
  "iss": "https://kubernetes.default.svc.cluster.local",
  "jti": "8d4b8b4c-08cf-49ba-9c93-5c8e11228afd",
  "kubernetes.io": {
    "namespace": "vault",
    "node": {
      "name": "myk8s-control-plane",
      "uid": "35345793-a4ef-4a7c-9bbe-d9ef8c015c3b"
    },
    "pod": {
      "name": "vault-injected-ui-77fb865789-2k4hp",
      "uid": "1e4266a2-c87b-4d1e-9453-e35d3f8796ce"
    },
    "serviceaccount": {
      "name": "vault-ui-sa",
      "uid": "400eb48e-e6a5-4d0f-9d38-47a75138e4cc"
    },
    "warnafter": 1764343717
  },
  "nbf": 1764340110,
  "sub": "system:serviceaccount:vault:vault-ui-sa"
}
- 정상적으로 Secret 생성되었는지 확인
-
http://localhost:30002 접속 후 확인

Step3. 리소스 삭제
# 실습시 생성한 리소스 삭제
kubectl delete deployment/nginx-vault-demo \
                deployment/vault-injected-ui \
                service/nginx-service \
                service/vault-injected-ui \
                sa/vault-ui-sa \
                secret/vault-approle -n vault


# 삭제확인
kubectl get deploy,svc,sa,secret -n vault
4. Jenkins + Vault (AppRole) - CI
실습1. Jenkins + KV 시크릿
Step0. (방안2) Jenkins 파드로 배포 : NodePort 30001
#
kubectl create ns jenkins
cat <<EOF | kubectl apply -f -
apiVersion: v1
kind: PersistentVolumeClaim
metadata:
  name: jenkins-pvc
  namespace: jenkins
spec:
  accessModes:
    - ReadWriteOnce
  resources:
    requests:
      storage: 10Gi
---
apiVersion: apps/v1
kind: Deployment
metadata:
  name: jenkins
  namespace: jenkins
spec:
  replicas: 1
  selector:
    matchLabels:
      app: jenkins
  template:
    metadata:
      labels:
        app: jenkins
    spec:
      securityContext:
        fsGroup: 1000
      containers:
        - name: jenkins
          image: jenkins/jenkins:lts
          ports:
            - name: http
              containerPort: 8080
            - name: agent
              containerPort: 50000
          livenessProbe:
            httpGet:
              path: "/login"
              port: 8080
            initialDelaySeconds: 90
            periodSeconds: 10
            timeoutSeconds: 5
            failureThreshold: 5
          readinessProbe:
            httpGet:
              path: "/login"
              port: 8080
            initialDelaySeconds: 60
            periodSeconds: 10
            timeoutSeconds: 5
            failureThreshold: 3
          volumeMounts:
            - name: jenkins-home
              mountPath: /var/jenkins_home
      volumes:
        - name: jenkins-home
          persistentVolumeClaim:
            claimName: jenkins-pvc
---
apiVersion: v1
kind: Service
metadata:
  name: jenkins-svc
  namespace: jenkins
spec:
  type: NodePort
  selector:
    app: jenkins
  ports:
    - nodePort: 30001
      port: 8080
      targetPort: http
      protocol: TCP
      name: http
    - port: 50000
      targetPort: agent
      protocol: TCP
      name: agent
EOF


# 확인
(⎈|kind-myk8s:vault) gaji:~$ kubectl get deploy,svc,ep,pvc -n jenkins
NAME                      READY   UP-TO-DATE   AVAILABLE   AGE
deployment.apps/jenkins   1/1     1            1           2m51s

NAME                  TYPE       CLUSTER-IP    EXTERNAL-IP   PORT(S)                          AGE
service/jenkins-svc   NodePort   10.96.71.71   <none>        8080:30001/TCP,50000:31339/TCP   2m51s

NAME                    ENDPOINTS                            AGE
endpoints/jenkins-svc   10.244.0.10:50000,10.244.0.10:8080   2m51s

NAME                                STATUS   VOLUME                                     CAPACITY   ACCESS MODES   STORAGECLASS   VOLUMEATTRIBUTESCLASS   AGE
persistentvolumeclaim/jenkins-pvc   Bound    pvc-35bd91f9-dc5c-4a06-a978-1ad98ad1d7ae   10Gi       RWO            standard       <unset>                 2m51s


# 초기 암호 확인
(⎈|kind-myk8s:vault) gaji:~$ kubectl exec -it -n jenkins deploy/jenkins -- cat /var/jenkins_home/secrets/initialAdminPassword
ad05#######################

# 웹 접속 : 기본 설정 진행
open "http://127.0.0.1:30001"
Step1. Jenkins에서 Vault Plugin 설치
Step2. Vault AppRole 정보 확인
- Vault에서 발급된 ROLE_ID, SECRET_ID는 이전에 생성한 role_id.txt, secret_id.txt 값을 참고하여 사용할 수 있습니다.
(⎈|kind-myk8s:vault) gaji:~$ cd approle-creds/

(⎈|kind-myk8s:vault) gaji:~/approle-creds$ cat role_id.txt
bf3ddf8a-8312-d918-b1db-f0e432a47c01

(⎈|kind-myk8s:vault) gaji:~/approle-creds$ cat secret_id.txt
58eb0d41-663f-4fa3-4e1b-5d79b9f6cbde
Step3. Jenkins에서 Vault 설정 및 Credentials 추가
- Vault Plugin 설정

Step4. Jenkins Pipeline Job 생성

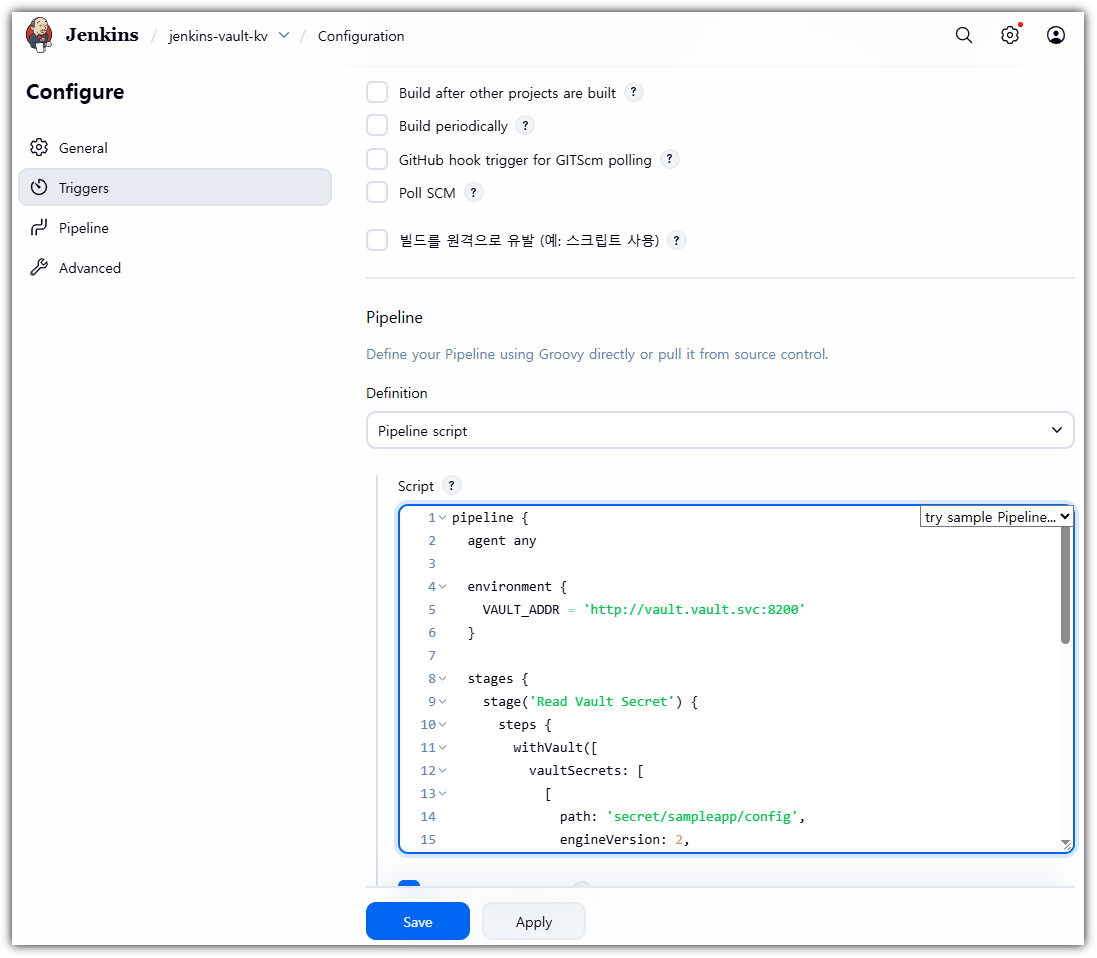
# Jenkinsfile

pipeline {
  agent any

  environment {
    VAULT_ADDR = 'http://9.81.158.59:30000' // 실제 Vault 주소로 변경!!! 파드 경우 http://vault.vault.svc:8200
  }

  stages {
    stage('Read Vault Secret') {
      steps {
        withVault([
          vaultSecrets: [
            [
              path: 'secret/sampleapp/config',
              engineVersion: 2,
              secretValues: [
                [envVar: 'USERNAME', vaultKey: 'username'],
                [envVar: 'PASSWORD', vaultKey: 'password']
              ]
            ]
          ],
          configuration: [
            vaultUrl: "${VAULT_ADDR}",
            vaultCredentialId: 'vault-approle-creds'
          ]
        ]) {
          sh '''
            echo "Username from Vault: $USERNAME"
            echo "Password from Vault: $PASSWORD"
          '''
          script {
            echo "Username (env): ${env.USERNAME}"
            echo "Password (env): ${env.PASSWORD}"
          }
        }
      }
    }
  }
}
-> 저장 후 '지금 빌드' 클릭

-
- 유의사항
- KV Version1은 경로에 data을 넣고 Version2는 경로에 data을 넣지 않습니다! - 참고링크
- Version 1 : secret/data/sampleapp/config
- Version 2 : secret/sampleapp/config
- sh 블록 vs script 블록
상황 사용 방식 sh 블록 $USERNAME, $PASSWORD script 블록 ${env.USERNAME}, ${env.PASSWORD}
- KV Version1은 경로에 data을 넣고 Version2는 경로에 data을 넣지 않습니다! - 참고링크
- 유의사항
Jenkins + 동적(Dynamic) DB 시크릿
1. Dynamic Secret이란? 요청 시 즉시 발급되고, TTL이 지나면 자동으로 사라지는 단기(Short-lived) 자격 증명
- 필요한 순간(Read)에 즉시 생성되는 자격 증명 → JIT(Just in Time)
- Lease(TTL) 기반으로 일정 시간이 지나면 자동 만료 → 최소 시간의 원칙 기반으로 관리!
- 필요하면 Lease 연장(renew) 가능
- 별도의 절차 없이 자동 폐기(revocation) 지원
- 저장되지 않고 **“읽기 시점에만 존재”**하기 때문에 노출 가능성 낮음
2. 왜 Dynamic Secret을 사용하는가? 정적 시크릿이 갖는 운영 부담과 보안 위험을 해결하는 방식
| 구분 | Static Secrets | Dynamic Secrets |
| 관리 관점 | 계정/비밀번호를 직접 생성 및 관리 | 필요 시 자동 발급 |
| 수명 | 장기간 사용, 변경 주기 거의 없음 | TTL 기반 단기 사용 후 자동 만료 |
| 운영 방식 | 생성·회전·폐기 모두 수동 | 생성·교체·폐기 모두 자동 |
| 문제점 | 장기 노출, 공유 계정, 추적 어려움 | 자동화로 운영 부담 감소 및 보안성 향상 |
1. 인프라 구성 (PostgreSQL on K8s)
- Vault가 계정을 생성해 줄 타겟 DB를 K8s에 배포합니다.
- Jenkins가 외부에서 접속 테스트를 해야 하므로 NodePort 30001을 열어둡니다.
# postgres-deploy.yaml
cat <<EOF | kubectl apply -f -
apiVersion: apps/v1
kind: Deployment
metadata:
  name: postgres
  namespace: default
spec:
  selector:
    matchLabels:
      app: postgres
  template:
    metadata:
      labels:
        app: postgres
    spec:
      containers:
        - name: postgres
          image: postgres:13
          env:
            - name: POSTGRES_PASSWORD
              value: "rootpassword"
            - name: POSTGRES_DB
              value: "mydb"
          ports:
            - containerPort: 5432
---
apiVersion: v1
kind: Service
metadata:
  name: postgres
  namespace: default
spec:
  type: NodePort
  ports:
    - port: 5432
      targetPort: 5432
      nodePort: 30002  # [External] Jenkins 접속용
  selector:
    app: postgres
EOF
2. Vault Database Engine 설정
- Vault가 DB 관리자 권한(rootpassword)을 가지고, 요청 시 임시 유저를 생성하도록 설정합니다.
# (로컬 터미널에서 수행)
(⎈|kind-myk8s:vault) gaji:~$ export VAULT_ADDR=http://127.0.0.1:30000
(⎈|kind-myk8s:vault) gaji:~$ export VAULT_TOKEN=root

# 1. Database Secret Engine 활성화
(⎈|kind-myk8s:vault) gaji:~$ vault secrets list
Path          Type         Accessor              Description
----          ----         --------              -----------
cubbyhole/    cubbyhole    cubbyhole_681de85c    per-token private secret storage
database/     database     database_1fab68bc     n/a   ### 새로 추가됨
identity/     identity     identity_9a7d3410     identity store
secret/       kv           kv_939d5550           key/value secret storage
sys/          system       system_d3518f05       system endpoints used for control, policy and debugging


# 2. Vault -> Postgres 연결 설정
# (Vault와 DB는 같은 K8s 안에 있으므로 내부 DNS 사용)
vault write database/config/my-postgresql-database \
    plugin_name=postgresql-database-plugin \
    allowed_roles="jenkins-role" \
    connection_url="postgresql://{{username}}:{{password}}@postgres.default.svc.cluster.local:5432/mydb?sslmode=disable" \
    username="postgres" \
    password="rootpassword"


# 3. "1시간짜리 임시 계정" 생성 규칙 정의 (DB Role)
# 주의: Vault 내부의 Role이 아니라, DB 엔진용 Role입니다.
vault write database/roles/jenkins-role \
    db_name=my-postgresql-database \
    creation_statements="CREATE ROLE \"{{name}}\" WITH LOGIN PASSWORD '{{password}}' VALID UNTIL '{{expiration}}'; GRANT SELECT ON ALL TABLES IN SCHEMA public TO \"{{name}}\";" \
    default_ttl="1h" \
    max_ttl="24h"
3. 기존 AppRole 권한 확장 (Policy Update)
- 새로운 AppRole을 만들지 않습니다.
- 기존 sampleapp-role이 사용하는 sampleapp-policy에 DB 접속 권한을 추가(Update) 합니다.
# 기존 KV 권한 + 새로운 DB 권한(database/creds/jenkins-role) 병합
vault policy write sampleapp-policy - <<EOF
# 1. KV v2 데이터 읽기
path "secret/data/sampleapp/*" {
  capabilities = ["read"]
}
# 2. KV v2 목록 조회 (플러그인 에러 방지용 필수!)
path "secret/metadata/sampleapp/*" {
  capabilities = ["list", "read"]
}
# 3. DB Creds 발급
path "database/creds/jenkins-role" {
  capabilities = ["read"]
}
EOF


# 업데이트된 Policy 확인 (위 내용과 동일한지 확인)
(⎈|kind-myk8s:vault) gaji:~$ vault policy read sampleapp-policy
# 1. KV v2 데이터 읽기
path "secret/data/sampleapp/*" {
  capabilities = ["read"]
}
# 2. KV v2 목록 조회 (플러그인 에러 방지용 필수!)
path "secret/metadata/sampleapp/*" {
  capabilities = ["list", "read"]
}
# 3. DB Creds 발급
path "database/creds/jenkins-role" {
  capabilities = ["read"]
}


# 관리자 로그인 상태에서 실행. token polices에 default도 함께추가
vault write auth/approle/role/sampleapp-role \
  token_policies="default,sampleapp-policy" \
  secret_id_ttl="0" \
  token_ttl="1h" \
  token_max_ttl="4h"
Note: 이렇게 하면 sampleapp-role을 가진 애플리케이션(Jenkins)은 별도의 재인증 없이, 다음 토큰 갱신이나 로그인 시점부터 바로 DB 권한을 쓸 수 있게 됩니다.
4. Pipeline 작성 (Jenkinsfile)
- 이제 파이프라인에서 KV Secret과 DB Dynamic Secret을 동시에 사용하는 시나리오를 구현합니다.

# Jenkinsfile
pipeline {
  agent any

  environment {
    // Jenkins(Docker) -> Vault(K8s NodePort)
    // 주의: http:// 가 포함된 전체 주소
    // Jenkins 파드 사용 시 : http://vault.vault.svc:8200
    VAULT_ADDR = 'http://9.81.158.59:30000'

    // Jenkins(Docker) -> DB(K8s NodePort)
    // 주의: DB 접속에는 프로토콜(http://) 없이 IP만 필요합니다.
    // Jenkins 파드 사용 시 : DB_HOST = 'postgres.default.svc' , DB_PORT = '5432'
    DB_HOST = '9.81.158.59'
    DB_PORT = '30002'
  }

  stages {
    stage('Vault 통합 및 DB 접속 테스트') {
      steps {
        withVault([
          configuration: [
            vaultUrl: "${VAULT_ADDR}",
            vaultCredentialId: 'vault-approle-creds',
            // ⚠️ 중요: 여기서 전역 engineVersion 설정을 하지 않습니다.
            skipSslVerification: true
          ],
          vaultSecrets: [
            // 1. KV Secret (정적 시크릿)
            // KV v2 엔진을 사용하므로 engineVersion: 2를 명시합니다.
            [
              path: 'secret/sampleapp/config',
              engineVersion: 2,
              secretValues: [
                [envVar: 'STATIC_USER', vaultKey: 'username']
              ]
            ],
            // 2. Database Secret (동적 시크릿)
            // DB 엔진은 기본 방식(v1)으로 통신해야 경로 에러가 없습니다.
            [
              path: 'database/creds/jenkins-role',
              engineVersion: 1,
              secretValues: [
                [envVar: 'DB_USER', vaultKey: 'username'],
                [envVar: 'DB_PASS', vaultKey: 'password']
              ]
            ]
          ]
        ]) {
          script {
            echo "=================================================="
            echo "             Vault 연동 테스트 시작                "
            echo "=================================================="

            // 1. 정적 시크릿 확인
            // sed 명령어로 글자 사이에 공백을 넣어 마스킹(****)을 우회합니다.
            // 예: d e m o
            sh '''
              echo "[1] KV Secret (Static)"
              echo " - 원본 값은 보안상 **** 로 표시됩니다."
              echo " - 실제 값 확인: $(echo $STATIC_USER | sed "s/./& /g")"
            '''

            // 2. 동적 시크릿 확인 (핵심!)
            // Vault가 생성한 임시 DB 계정(v-token-...)을 확인합니다.
            sh '''
              echo "--------------------------------------------------"
              echo "[2] Database Secret (Dynamic)"
              echo " - Vault가 생성한 임시 계정 ID입니다."
              echo " - 실제 값 확인: $(echo $DB_USER | sed "s/./& /g")"
              echo "--------------------------------------------------"
            '''

            // 3. DB 접속 시뮬레이션
            // 실제 애플리케이션에서 DB 연결 문자열을 만드는 과정입니다.
            sh '''
              echo "[3] DB Connection Simulation"
              echo " - Connecting to: ${DB_HOST}:${DB_PORT}"
              echo " - User: ${DB_USER}"
              echo " - Password: (Hidden)"
              echo " >> ✅ DB 접속 테스트 성공! (가상)"
            '''
          }
        }
      }
    }
  }

  post {
    success {
      script {
        echo "🎉 Pipeline 성공!"
        echo "   -> 확인된 DB 계정(${env.DB_USER})은 Vault의 TTL 설정에 따라 1시간 후 자동 삭제됩니다."
      }
    }
    failure {
      echo "💥 Pipeline 실패! Vault 로그나 네트워크 설정을 확인하세요."
    }
  }
}
-> '지금 빌드' 후 확인

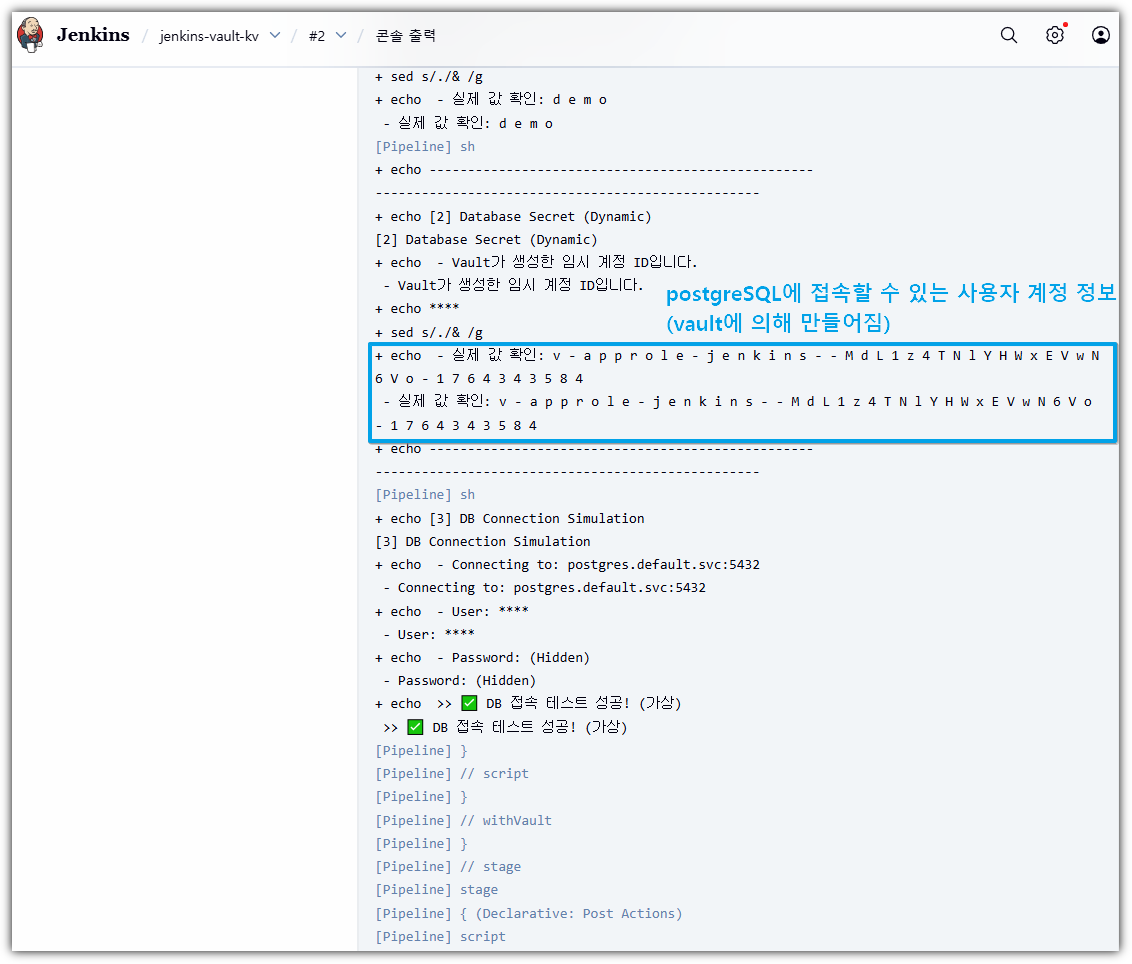
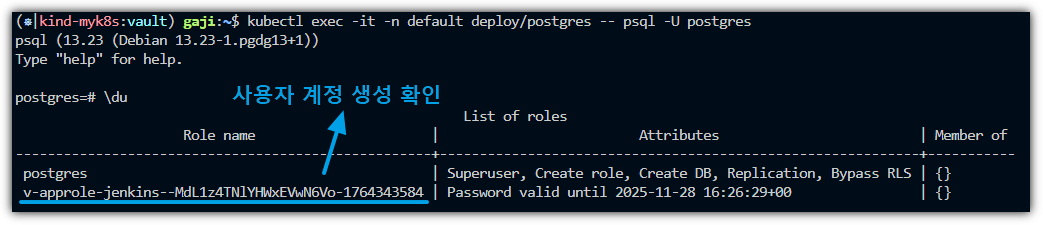
-> 젠킨스에서 확인한 값과 동일함
- Jenkins에서 다시 빌드하면 새로운 값이 또 생김


-> 또 생김
- 직접 CLI 명령으로 동적으로 생성하는 것도 가능 → 단, 새로운 계정이 만들어지므로 주의
- 즉, Username & Password가 생성됨
vault read database/creds/jenkins-role
5. 암호화(Encryption)와 Vault Transit 엔진
- 이번 챕터에서는 암호화의 기본 개념을 다지고 HashiCorp Vault가 제공하는 강력한 Encryption as a Service (EaaS) 기능을 살펴봅니다.
- 특히 OSS 버전에서 바로 사용할 수 있는 Transit 엔진을 중심으로 실습을 진행하며 엔터프라이즈 기능 및 기존 KMS와의 차이점도 함께 알아봅니다.
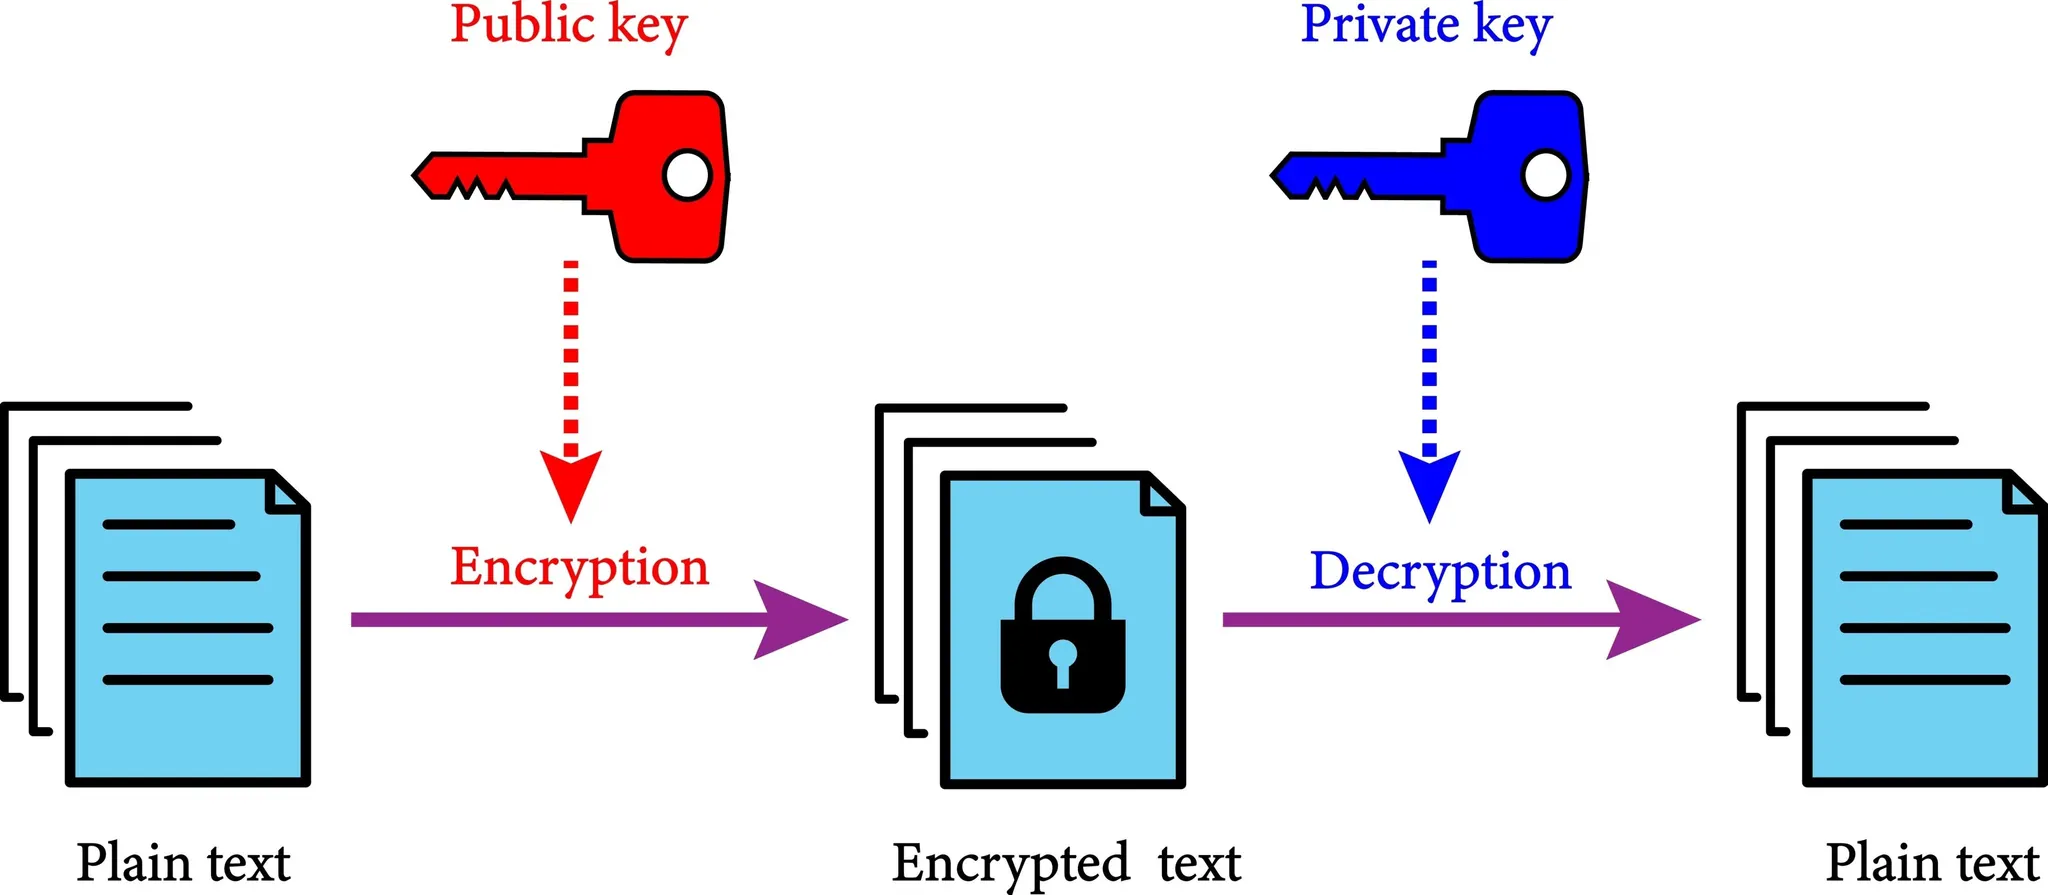
1. 암호화 기본 개념 다시보기
3가지 핵심 암호화 방식
암호화는 크게 키 사용 방식과 목적에 따라 세 가지로 나뉩니다.
| 구분 | 설명 | 특징 및 용도 |
| 대칭키 (Symmetric) | 암호화와 복호화에 같은 키를 사용 | • 빠름, 대용량 데이터 처리에 적합 • 키가 유출되면 보안이 뚫리므로 키 관리(Key Management)가 핵심 • 예: AES, ChaCha20 • 예: AWS KMS, TLS 세션 암호화 |
| 비대칭키 (Asymmetric) | 공개키(암호화)와 개인키(복호화)가 분리됨 | • 키 교환, 전자 서명, 신원 인증에 적합 • 연산 비용이 높아 대용량 데이터에는 부적합 • 예: RSA, ECDSA • 예: SSH 접속(SSH Key Pair), TLS 인증서(HTTPS), PKI(CA 등) JWT, OAuth, OpenID Connect 등 |
| 해시 (Hash) | 데이터를 고정된 길이의 문자열로 변환 (복호화 불가) | • 일방향성, 데이터 무결성 검증 • 비밀번호 저장 시 (Salt + Iteration) 필수 사용 • 예: SHA-256, SHA-512 • 예: Docker 이미지 digest, Git commit hash, Cosign 서명 등 |
계층별 암호화 방안
데이터가 존재하는 위치에 따라 암호화 전략이 달라집니다. Vault는 주로 애플리케이션 계층을 강력하게 지원합니다.
-
- 전송 구간 (Data in Transit): 데이터가 네트워크를 이동할 때 보호합니다. (예: TLS/SSL)
- 저장 구간 (Data at Rest): 디스크나 DB에 저장될 때 보호합니다. (예: TDE, AWS EBS 암호화)
- 한계: DB 관리자(DBA)나 인프라 관리자는 평문 데이터에 접근할 수도 있습니다.
- K8s ETCD를 안전하게 관리하는 방법은 무엇이 있을까요?
- https://kubernetes.io/docs/tasks/administer-cluster/encrypt-data/
- 애플리케이션 계층 (Application Level Encryption): (이번 실습에서 주로 다룰 내용)
- 데이터가 DB에 저장되기 전, 앱 단계에서 암호화를 수행합니다.
- DB에는 암호문(Ciphertext)만 저장되므로, DB가 털려도 데이터 내용을 알 수 없습니다.
- 데이터가 존재하는 위치에 따라 암호화 전략이 달라집니다. Vault는 주로 애플리케이션 계층을 강력하게 지원합니다.
2. Vault가 지원하는 암호화 방식
- OSS (Open Source) 제공 기능
- 1. Transit Engine — “암복호화 자체를 제공하는 암호화 서비스” (Encryption-as-a-Service)
- 개념: 애플리케이션은 데이터를 갖고 있고, Vault는 암호화/복호화/서명 연산과 키 관리만 담당합니다.
- 특징:
- Vault는 입력된 Plaintext를 절대 저장하지 않음
- 암호화 결과(ciphertext)만 반환하며, 키는 Vault 내부에서만 보호됨
- 내부적으로 AES-256-GCM 기반 대칭키 암호화 사용
- 장점:
- 애플리케이션에 키를 둘 필요가 없으며 → 키 외부 보관 요건 충족
- Vault 정책으로 접근 제어 가능 → 서비스 간 키 공유 문제 해결
- 2. KV + Response Wrapping — “암호화된 Storage와 안전한 전달 방식”
- KV:
- 정적(Static) 시크릿—DB Credentials, API Key—등을 저장하고 읽는 용도
- Versioning(V2) 기능으로 Secret 변경 이력 관리 가능
- Response Wrapping:
- 민감한 시크릿을 직접 전달하지 않고, 1회성 토큰(=Wrapping Token)을 발급
- 이 토큰은 Cubbyhole이라는 1회용 개인 공간에 시크릿을 임시 보관
- TTL 후 자동 삭제 → 전달 과정에서의 유출 위험 제거
- CI/CD 파이프라인, 자동화 시스템에서 안전한 Secret 전달 패턴으로 필수
- KV:
- 3. PKI / SSH / TOTP — “비대칭키 기반의 인증·신원 검증”
- PKI (Public Key Infrastructure):
- Vault는 Root CA 또는 Intermediate CA 역할 수행
- 단기 수명 인증서(Short-lived certificate) 발급 → 인증서 관리 부담 감소
- TLS / mTLS 기반 서비스 간 인증용으로 많이 활용
- SSH Secrets Engine:
- SSH 키를 직접 배포하지 않고, Vault가 SSH 인증서를 서명(Signed Certificate)
- 공개키 / 개인키 관리 부담 감소, 접속 이력화 가능 → 감사(Audit)가능
- TOTP:
- Google Authenticator 같은 OTP를 Vault가 직접 생성
- SSH·클라우드 콘솔 로그인 시 MFA 추가 가능
- PKI (Public Key Infrastructure):
- 1. Transit Engine — “암복호화 자체를 제공하는 암호화 서비스” (Encryption-as-a-Service)
- Vault는 단순한 키 저장소를 넘어, 암호화 연산을 대신 수행해 주는 기능을 제공합니다.
Transit의 기본 동작구조

실습
1) Vault Transit 활성화
# Vault 서버 현재 상태 확인 (Seal 여부, 클러스터 상태 등)
vault status

# Transit 엔진 활성화 (암복호화 전용 엔진)
vault secrets enable transit

# 활성화된 모든 Secrets Engine 목록 보기
(⎈|kind-myk8s:vault) gaji:~$ vault secrets list
Path          Type         Accessor              Description
----          ----         --------              -----------
cubbyhole/    cubbyhole    cubbyhole_681de85c    per-token private secret storage
database/     database     database_1fab68bc     n/a
identity/     identity     identity_9a7d3410     identity store
secret/       kv           kv_939d5550           key/value secret storage
sys/          system       system_d3518f05       system endpoints used for control, policy and debugging
transit/      transit      transit_dd0a7daa      n/a


# ds-poc 이름의 암호화 키 생성 (AES-256-GCM 모드 사용)
(⎈|kind-myk8s:vault) gaji:~$ vault write -f transit/keys/ds-poc type=aes256-gcm96
Key                       Value
---                       -----
allow_plaintext_backup    false
auto_rotate_period        0s
deletion_allowed          false
derived                   false
exportable                false
imported_key              false
keys                      map[1:1764346066]
latest_version            1
min_available_version     0
min_decryption_version    1
min_encryption_version    0
name                      ds-poc
supports_decryption       true
supports_derivation       true
supports_encryption       true
supports_signing          false
type                      aes256-gcm96

# Transit 엔진 내에 생성된 키 목록 확인
(⎈|kind-myk8s:vault) gaji:~$ vault list transit/keys
Keys
----
ds-poc

# 암/복호 테스트 (복붙)
PLAINTEXT="My Data"

# 평문을 Base64 → Vault Encrypt API 호출 → ciphertext 출력값 저장
CIPHERTEXT=$(vault write -field=ciphertext transit/encrypt/ds-poc \
  plaintext=$(echo -n "$PLAINTEXT" | base64))

# 암호문(Ciphertext) 값 확인
(⎈|kind-myk8s:vault) gaji:~$ echo "ciphertext: $CIPHERTEXT"
ciphertext: vault:v1:AGLJRFWjy37tWPzs8hZXShyyB8bVd6JO0r/fzySj/D66C9A=

# 암호문을 Vault Decrypt API에 전달 → base64-decoding → 원문 출력
(⎈|kind-myk8s:vault) gaji:~$ vault write -field=plaintext transit/decrypt/ds-poc \
ertext="$CIP>   ciphertext="$CIPHERTEXT" | base64 -d && echo
My Data
2) MySQL 배포 (NodePort 30002)
cat <<EOF | kubectl apply -f -
apiVersion: v1
kind: Namespace
metadata:
  name: ${NS}
---
apiVersion: apps/v1
kind: Deployment
metadata:
  name: mysql
  namespace: ${NS}
spec:
  selector:
    matchLabels:
      app: mysql
  template:
    metadata:
      labels:
        app: mysql
    spec:
      containers:
      - name: mysql
        image: mysql:8.0.31
        env:
        - name: MYSQL_ROOT_PASSWORD
          value: "rootpassword"
        ports:
        - containerPort: 3306
---
apiVersion: v1
kind: Service
metadata:
  name: mysql
  namespace: ${NS}
spec:
  type: NodePort
  selector:
    app: mysql
  ports:
  - name: mysql
    port: 3306
    targetPort: 3306
    nodePort: 30002
EOF
- MySQL 배포확인 및 샘플 DB 생성
# 배포확인
(⎈|kind-myk8s:vault) gaji:~$ kubectl -n ${NS} rollout status deploy/mysql
deployment "mysql" successfully rolled out

# DB 생성/계정 (root 사용; 필요 시 app/password 생성)
(⎈|kind-myk8s:vault) gaji:~$ kubectl -n ${NS} exec -it deploy/mysql -- \
>   mysql -uroot -prootpassword -e "CREATE DATABASE IF NOT EXISTS VaultData;"
mysql: [Warning] Using a password on the command line interface can be insecure.

# Database 생성확인
(⎈|kind-myk8s:vault) gaji:~$ kubectl -n ${NS} exec -it deploy/mysql -- \
>   mysql -uroot -prootpassword -e "SHOW DATABASES LIKE 'VaultData';"
mysql: [Warning] Using a password on the command line interface can be insecure.
+----------------------+
| Database (VaultData) |
+----------------------+
| VaultData            |
3) Transit Demo 앱 배포
cat <<EOF | kubectl apply -f -
apiVersion: apps/v1
kind: Deployment
metadata:
  name: vault-transit-demo
  namespace: ${NS}
spec:
  replicas: 1
  selector:
    matchLabels:
      app: vault-transit-demo
  template:
    metadata:
      labels:
        app: vault-transit-demo
    spec:
      containers:
      - name: app
        image: ${IMAGE}
        imagePullPolicy: IfNotPresent
        ports:
        - containerPort: 8080
        env:
        - name: MYSQL_HOST
          value: mysql.${NS}.svc.cluster.local
        - name: MYSQL_PORT
          value: "3306"
        - name: MYSQL_DB_NAME
          value: VaultData
        - name: MYSQL_USERNAME
          value: root
        - name: MYSQL_USERPW
          value: rootpassword
        - name: VAULT_HOST
          value: vault.vault.svc.cluster.local    # 필요 시 노드 IP/NodePort로 교체
        - name: VAULT_PORT
          value: "8200"                           # NodePort로 붙을 땐 30000 등으로 교체
        - name: VAULT_SCHEME
          value: http
        - name: VAULT_TOKEN
          value: root
        - name: VAULT_TRANSIT_KEY_NAME
          value: ds-poc
        - name: SERVER_PORT
          value: "8080"
        - name: AWS_REGION
          value: "ap-northeast-2"
---
apiVersion: v1
kind: Service
metadata:
  name: vault-transit-demo
  namespace: ${NS}
spec:
  type: NodePort
  selector:
    app: vault-transit-demo
  ports:
  - port: 8080
    targetPort: 8080
    nodePort: 30003
    name: http
EOF
4) 실습: 애플리케이션 레벨에서 컬럼 암호화 및 파일 암호화
- 웹 접속 - http://localhost:30003
→ 웹 접속이 안 돼서 이후 실습은 영상으로만 확인
'STUDY - CICD' 카테고리의 다른 글
| 8주차 (2) - Vault Production (0) | 2025.12.13 |
|---|---|
| 8주차 (1) - Hashicorp Vault/VSO on K8S (0) | 2025.12.13 |
| 6주차 - Argo CD 3/3 (1) | 2025.11.20 |
| 5주차 - Argo CD 2/3 (0) | 2025.11.15 |
| 4주차 - Argo CD 1/3 (0) | 2025.11.08 |